Wednesday 9 November 2011

Bunches of flowers (Made of cake)

In going to a party on the weekend, I wanted to bring something for my lovely hostess Katherine, and what could be better than a little bunch of flowers. The only difference being that I wanted the flowers to be edible.


These cakepops have a centre of chocolate mud cake, crumbled and mixed with dark chocolate ganache.


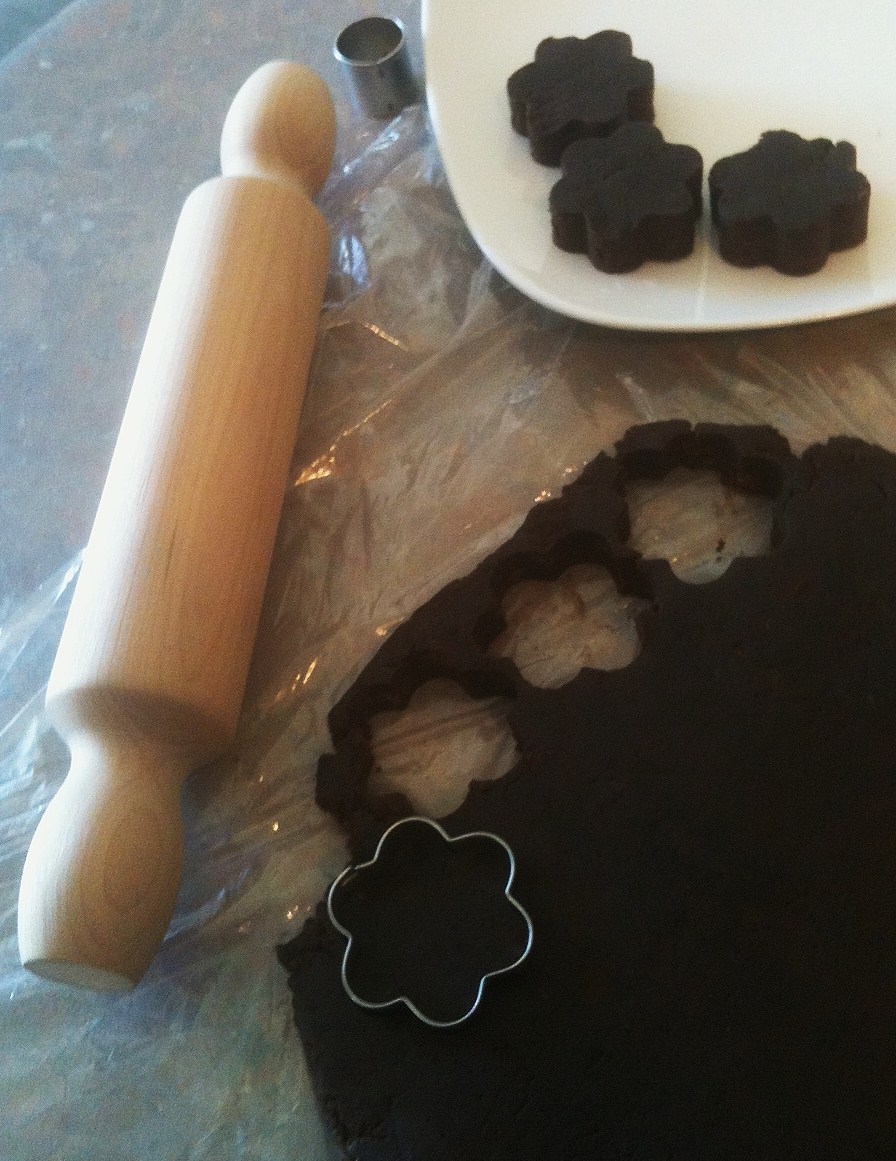
Cake pops are a lengthy process when you have to make the cake and the ganache (or filling) from scratch. However, when you have ready-made supplies of both (see pic on left) it's a lot more straightforward.

Cake and ganache both freeze beautifully so whenever I have any extra left from a project I sock it away in the freezer. Just call me Martha Stewart. At some stage I will get around to putting up the chocolate mud cake recipe I use but you can use any type of cake.


The cake needed to be crumbled into small pieces, then mixed with enough ganache to make it 'ball' against the sides of the bowl.


The aim is to get a smooth(ish) ball of cakepop 'pastry' that might be a bit sticky but hangs together really well.

Because I wanted to roll it out and stamp some cutter shapes from it, I flattened it into a rough circle by hand, wrapped it in clingfilm and put it in the freezer for 10 minutes to get it to firm up a bit.


To roll it out, a sheet of clingfilm over the top of the mixture as well as underneath is heaps easier. What I mean is, you unwrap the mixture and leave the clingfilm sitting underneath, then put a fresh piece of clingfilm in between the mix and the rolling pin. This means you can roll out the mix without it sticking to the rolling pin.

Then I used a flower cutter to get my shapes. I had to re-roll the mixture a couple of times to get all my flowers.


I then had a brilliant idea which turned out to be a massive mistake. I tried to introduce a bit of three dimensionality into the flat shapes by pressing a ball tool into the centre to make a dip, which I would then fill, after the flower was coated, with a mini M&M.

What I found out when I started dipping the shapes was that the coating mixture didn't like these little depressions in the middle of an otherwise flat shape, the coating didn't work smoothly. It was either too thin on the 'petal' bits or so thick on the centre that you couldn't tell there was a dip at all. So my advice is, don't try to be too fancy.


While the coating was melting (for detailed instructions, see here) I put the flowers back in the fridge to firm up again. It's really important to keep them very cold and hard because when they get dipped into a hot coating they are liable to soften up or get a bit melty.

Firstly you dip just the top of the stick into the coating, then you stick it into one of your shapes. It was a bit tricky to do this because I had made the flowers quite thin front to back, about 2cm, and I needed to put the stick through this narrow edge. Remember I also made a dip in the middle of the flower? Yeah - that didn't go well either.


This is what it looks like when it goes right. The coating is covering the pop evenly, the extra coating is dripping off the other side whn the stick is tapped gently against the bowl.


... And this is what it looks like when it goes wrong.


... As you see, when it goes wrong, it's hard to even get it out of the bowl. What happened here is that the stick was a bit crooked when I stuck it into the narrow edge of the flower. When I dipped it, the extra weight of the melt mixture pulled the flower downwards while I was pulling upward with the stick, and the stick broke through the flower and came out - leaving a trail of dark cake crumbs through my melt mixture, which was a problem for the whole rest of the dipping session.


Anyway - back to the nicer looking ones (thank god).

When they come out of the mix, straightaway decorate them with mini M&Ms, cachous or whatever works best. I found that one M&M in the centre and a selection of metallic-coloured cachous one the petals worked quite well.


Now to show you what happens when cake pops go bad!

Yes, apart from the disaster above which didn't get as far as being decorated, I had a few really horrible cake pops:

Why are my cake pops spiky?
Spiky mounds of melt mixture (left) happen when you don't tap the extra melt mixture off fast enough, or only get one side smooth and neglect to turn the pop over to check the other side is smooth too.


Why are my cake pops rough and swirly?
This happens (right) when (a) you don't have enough mixture in the bowl, so instead of slowly lowering it vertically and covering any gaps with a spatula, you swish it around the bottom of the bowl and coat it unevenly; and (b) the melt mix is starting to cool too much.


Why do my cake pops look so WRONG?

This one at the left should never have got to decorating stage. You can see how the melt mixture was very uneven and seemed to have divided into two layers. Why bother trying to fix it with cachous... when you know it's going to have to go in the bin!


Why are my cake pop decorations uneven?

Well... possibly because you're not very good at sprinkling tiny objects onto a rapidly-drying melt surface so that they are evenly spaced! These little tiny flower shapes are pretty but beware, they are very difficult to handle well. I should have used tweezers to pick them up and place them accurately. The melt mixture dries very quickly too, so if you drop one in the wrong place, it's difficult to remove without leaving a mark on the surface. Needless to say this one got the flick as well.


Having got the ugly, yucky ones out of the way here's a reminder of what they SHOULD look like!

Once I had a decent quantity of these, I began to investigate packing options.


They were quite pretty wrapped individually in cello bags with a ribbon tie. This had the added benefit of providing a bit of protection and sealing, as it's a difficult shape to fit in a gift box.


This was the final presentation of my bunch of flowers for my hostess. I have to admit I would have liked to use fancier paper and nicer ribbons, like that swanky thick textured Japanese paper you get around expensive bunches of real flowers... but I had to make do with what was in the house already... some of Mr Cupcake's fancy printer paper.


And the great thing was that there were plenty left over to reach a wider audience. Miss Lucy Tomlin was apparently pretty happy to see a cake pop carefully taken home for her by her daddy.


That's it for flower pops... in summary, they were fun, reasonably simple, but a few traps for young players with putting sticks into relatively narrow edges. These were harder (quite a bit harder) than cake pop chicks (here) or even the strawberries (here), but definitely worth a go for a flowery bouquet of edible goodness!

Monday 31 October 2011

Horse race cake for Melbourne Cup (cake) Day

Melbourne Cup Day is the first Tuesday in November, the greatest event on the racing calendar all year. Others may have the Grand National and Ascot, but for an Australian there is nothing better than the race at which legends are made. 
So the least I could do was to celebrate the event with a horse race cake. 


In Australia, it's 'the race that stops the nation' - so of course the other side of the flag had to read...


As Flemington race course has a grass racing surface (Mr Cupcake helpfully informed me of that, I assumed they raced on a sandy track) I made a little grassy ring on top of a sandy track-type surface. 

If I'd had an oval tin, I would have used that, but mehhh.... circles are good for racing too aren't they?


This was the very simple start to the horse race cake. A chocolate mud cake, adapted to be gluten free (regular readers of this blog will begin to notice a pattern here) - I swear, it makes not a jot of difference to the taste. 

I had two cake tins exactly the same size and 'nested' them to bake this, so that there would be an extra layer of insulation - the tins were quite thin so this effectively doubles the thickness of the tin and ensures a more consistent heat spread and a better result. 


I drizzled the cake with a diluted, strained apricot jam to keep it moist, then ganached the cooled cake and hot-knifed the ganache for a smooth surface (detailed instructions here).

Then I rolled out a piece of sandy-coloured fondant big enough to cover the top and sides in one piece, and draped it over, attaching it to the cake with a light painting of water. 


I smoothed the fondant from the centre outwards, using first my hands, then a cake smoother (amazing plastic contraption that looks a bit like a skinny little iron). I trimmed around the base really carefully - this is actually really hard to do, and usually I have to cover my terrible mess with a ribbon on the base. But I was really OCD about it this time, and it paid off. 


So then it was time to work on the horses. 

I'd seen a blurry front-on pic of a horse figure that some brilliant person had posted on Facebook's Cake Decorating Society page. That started me on my modelling but there was a lot of experimentation involved. 

Here you see the horse body (the big bit), and the four little legs, with toothpicks sticking out for support when the figure is put together. 


Same deal, different colour - once I had a pattern I tried to be consistent in size and shape, and kept a finished horse beside me all the time to use as a model. 


This disembodied horse's head may freak out anyone who's seen The Godfather, but I promise you it's perfectly innocent. His little head had to be made separately before being attached because of the detail on the face. 

Ears were two layers of teardrop shaped fondant in contrasting colours; his blaze (do you call it that? - Yasmin, my most knowledgeable horse friend where are you when I need you) - anyway, his STRIPE down his nose, and his muzzle, were rolled fondant cut into a strip and pressed by hand into an oval, respectively. 
The two nostrils were made with tweezers - I keep a pair exclusively to use for cake decorating. 


I was worried about whether his little legs would collapse under the weight of his big fat tummy, but fortunately he held together very well, the little darling. He looks a bit scared. Big race coming up. 


He looked even more worried when I added his mane and tail. 


So I gave him some friends as quickly as possible, to calm his nerves and get some track work underway.

Cornflour helps their little hooves from sticking to the track. 


This is a rather undignified shot of a cheeky little mare with a white mane and tail. 


Her hairy bits were created from little strips shown here - the top one is the mane, and the lower is the tail, which gets rolled up a bit at one end and attaches to a little hole in her backside with a drop of water. 


Track work now commenced in earnest with four gallopers trying to lose their paunches before the big race. 
The one at the back still looks absolutely terrified, poor darling. 


...And so it was finally time to get them onto the course. As Mr Cupcake pointed out, their jockeys have not yet mounted, so this is possibly a training run. 


Place your bets, ladies and gentlemen... have a wonderful Melbourne Cup Day and think of me and my colleagues in the office, taking a break for the few minutes of the race and accompanying it with a little bit of horse race cake!


Halloween cupcakes with sugar skulls

Ever since last Halloween, when I used PLASTIC skull favours to decorate cupcakes (here) and felt dirty for doing it, I have been thinking of how to make edible skulls for these rich but sinister little cupcakes.


The interior of the cupcake is a chocolate mud cake rich in shortening, sugar and chocolate and light on flour. I used gluten free flour too, because increasingly people are experiencing gluten intolerance and this makes cakes more accessible for many of my friends.


 The sugar skulls were cast from plasticine moulds using a convenient blingy skull necklace that I had to hand. Neither the casting medium nor the object from which the cast was taken were ideal, but after a full month searching for a plastic skull of the right size (like the ones I THREW AWAY last year) and some high quality DAS hard-drying modelling material (like my Dad sold for 20 years on end in his toyshop) I gave up on both and used the only things I had to hand. Considering the materials I had to work with, I was really pleased with the result.


So I pressed my little skull necklace into some kids' plasticine that promised to be 'air-drying'. 
My first task after that was to dig through the toolbox for the superglue and retrieve and glue back the diamante decorations that had been pulled out of my little skull by the plasticine (I told you it was blingy). 
The plasticine was not as air-drying as I would have liked but it was adequate. The sugar mix recipe is here


After pressing the sugar into the mould, I immediately unmoulded it, repeating the process about 20 times and dusting the mould with cornflour each time to prevent sticking. 
The unmoulding process was not without its dramas. The mould had to be tapped firmly onto a waiting piece of cardboard, then gently trimmed at the edges to clean up unwanted grains.


...As I said, the unmoulding process was not without its problems. 


But within an hour I had a set of sweet little sugar skulls resting on a baking tray. The differences were interesting - I made two moulds, so you'd expect two sets of identical skulls, but there was a bit of variation in how well the sugar stuck to the molds, and how I trimmed the unmoulded pieces. 

I left them to dry in a warm place for 24 hours to firm up. 


Next for the actual cupcakes. I had planned to make full size cupcakes, but the skulls were small in comparison to that surface area so I elected to make mini cupcakes, thinking that the decoration would be more proportionate. 

As noted above I used a rich chocolate mud mixture, but you could use any type of cake. 


I've talked before about the importance of good baking tins, with some thickness. I had two mini cupcake baking trays of exactly the same size, so I nested them one inside the other, using only the top one for the cupcakes. This provides an extra insulation layer for small cakes that can otherwise burn easily. 

After baking, I brushed them with a watered-down and strained apricot jam syrup, to retain the moisture inside them - not necessary, but it makes them last longer. 


Then, to get a smooth-as-silk surface for my fondant decoration, I ganached the tops of the cupcakes, pressing ganache into all the small bumps and cracks to end up with a perfectly smooth surface. This lets you use a very thin layer of fondant while still achieving a smooth surface. 


Next came the fondant covering. I used black fondant, coloured with black gel colouring (tip: wear latex gloves when mixing it up). Then I rolled it out thin and cut circles with a cutter a little bigger than the surface of the cupcake. 


Attaching the fondant circle to the top of the cupcake with a few drops of water, I burnished it with some clear acrylic like in this picture. This smoothes the top perfectly and gently pushes the edges of the fondant down to meet the edge of the paper liner. 


This is the production line showing the next three stages. 

On the bottom right is a fondant-covered cupcake. Next it is sprayed with a clear food lacquer (amazing product and worth the money); then a small dot of royal icing is piped or dotted in the middle of the glossed cupcake, to act as adhesive for the skull. Finally the skull is gently placed in the centre. 


The scale of the mini cupcake was effective for the size of the skull. 


I had a few more cupcakes than skulls, so to finish off, I made some Halloween toadstool rings with some little sugar toadstools that I've had for some time (not home made). 


My Eureka moments in making Halloween Skull Cupcakes: 
  • Diamantes are easy to lose if they fall into the carpet. 
  • If you're cooking gluten-free, make sure you grease and flour cake tins, and flour moulds, with gluten free flour as well. Don't make your friends hate you. 
  • Be careful with fan forced ovens because they always cook a bit quicker than you're prepared for. 
  • If you drop a full glass bottle of blackberry cordial on a tile floor in the middle of baking, allow an extra hour for clean up. 
  • Try to be extra careful not to get cornflour (for rolling our your fondant) onto the top surface of black fondant because it is very difficult to remove. 
Happy Halloween everybody!!!