 These little chicks have a cheeky look to them and they're full of character, but surprisingly simple to make, Sitting on top of a chocolate mud cupcake, they make for a festive Easter.
Thanks to Sally Alps of Alps & Amici for this lovely design.

To start, ganache your cupcake so that you have a flat smooth surface (see previous posts). Then roll and cut a small white fondant circle and stick it in the middle of your cupcake, using a drop of water to fix it in place. It doesn't matter if the edges aren't perfect, because these will be covered. Coat the top of the circle with cornflour - you can see a thick sprinkle of cornflour in this pic.
Then cut a larger circle out of white fondant and lay it on top of the cupcake, pressing down gently around the double-thickness circle in the middle, and burnishing the edges carefully with a piece of hard plastic (see previous posts). You will end up with a white fondant-topped cupcake which looks smooth but has a raised circular shape in the centre due to the double thickness of the fondant.
Now take a small sharp knife and make a straight cut through the double thickness circle in the middle.
Then make another cut at right angles to it, so that you have cut a cross.
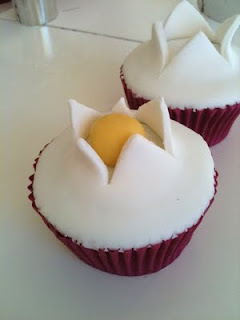
Using the edge of the knife blade, gently prise the corners of the top layer of fondant up and fold them back a little so that they stick up into the air. This is your 'cracked eggshell'.
If the white base underneath is cut or marked don't panic because the chicken will be sitting on that bit so you won't see it.
Next roll a ball of yellow fondant and cut one side of it off with a sharp knife so that you have a flat surface at the base. Stick this into the 'egg' with a drop of water. This is the chicken's body.

Roll a smaller ball of yellow fondant for the chicken's head and stick it to the body with a drop of water. Be careful not to use too much water or you'll end up with a very sticky chicken.
Get a tiny piece of orange fondant and roll a little cone shape between your thumb and forefinger. Cut the cone off at its base with a small knife - it should be about 2mm long.
Then take a slightly larger piece of orange fondant and make a comb for the chicken's head. This starts off as a flattish sort of oblong shape. Stand the oblong up horizontally, so that one of its sides flattens out to form a base. Then use a small pair of scissors (sterilised nail scissors or barber's scissors are good) to snip into the other side of the oblong, like in this pic. When finished, carefully position the comb on the chicken's head and fix with a very tiny drop of water.
Paint two tiny black dots for eyes, using black food colouring or an edible food pen in Jet Black (available from cake decorating stores).
In this pic, I have done the eyes of the front chicken but he has not yet got his comb on. The chickens at the back have obviously been distracted by something happening off camera to the left.
Hey presto Easter chickens hatching out of pure white eggs!
A small tip, it helps if your cupcakes are quite domed on top - mostly I aim for flat topped cupcakes, but these seem more 'eggy' if they are rounded.
You could have all sorts of creatures hatching from these eggs (if it wasn't Easter of course). I've seen some awesome Paris Cutler designs of baby dinosaurs hatching.
As we know, it's not all about fondant. Sometimes there's room for old fashioned glace icing (especially when you're doing gluten free orange and almond cakes that sink in the middle and don't give you a flat surface).
These little cakes are iced with a lemon glace icing (lemon juice and icing sugar stirred to a stiff paste) with a little yellow colouring added.
The icing was piped on using a star nozzle to get a slightly 'nestlike' shape, and the eggs pressed into the icing while it was still soft.
I used some pretty little milk chocolate eggs that were a quick purchase from the supermarket. I loved the speckles and the soft eggshell like colours.
Happy Easter, may the Easter Bunny be generous and not lead you on too exhausting an Easter Egg Hunt. :-)


