 Ever since last Halloween, when I used PLASTIC skull favours to decorate cupcakes (here) and felt dirty for doing it, I have been thinking of how to make edible skulls for these rich but sinister little cupcakes.
The interior of the cupcake is a chocolate mud cake rich in shortening, sugar and chocolate and light on flour. I used gluten free flour too, because increasingly people are experiencing gluten intolerance and this makes cakes more accessible for many of my friends.
The sugar skulls were cast from plasticine moulds using a convenient blingy skull necklace that I had to hand. Neither the casting medium nor the object from which the cast was taken were ideal, but after a full month searching for a plastic skull of the right size (like the ones I THREW AWAY last year) and some high quality DAS hard-drying modelling material (like my Dad sold for 20 years on end in his toyshop) I gave up on both and used the only things I had to hand. Considering the materials I had to work with, I was really pleased with the result.
So I pressed my little skull necklace into some kids' plasticine that promised to be 'air-drying'.
My first task after that was to dig through the toolbox for the superglue and retrieve and glue back the diamante decorations that had been pulled out of my little skull by the plasticine (I told you it was blingy).
The plasticine was not as air-drying as I would have liked but it was adequate. The sugar mix recipe is here.
After pressing the sugar into the mould, I immediately unmoulded it, repeating the process about 20 times and dusting the mould with cornflour each time to prevent sticking.
The unmoulding process was not without its dramas. The mould had to be tapped firmly onto a waiting piece of cardboard, then gently trimmed at the edges to clean up unwanted grains.
...As I said, the unmoulding process was not without its problems.
But within an hour I had a set of sweet little sugar skulls resting on a baking tray. The differences were interesting - I made two moulds, so you'd expect two sets of identical skulls, but there was a bit of variation in how well the sugar stuck to the molds, and how I trimmed the unmoulded pieces.
I left them to dry in a warm place for 24 hours to firm up.
Next for the actual cupcakes. I had planned to make full size cupcakes, but the skulls were small in comparison to that surface area so I elected to make mini cupcakes, thinking that the decoration would be more proportionate.
As noted above I used a rich chocolate mud mixture, but you could use any type of cake.
I've talked before about the importance of good baking tins, with some thickness. I had two mini cupcake baking trays of exactly the same size, so I nested them one inside the other, using only the top one for the cupcakes. This provides an extra insulation layer for small cakes that can otherwise burn easily.
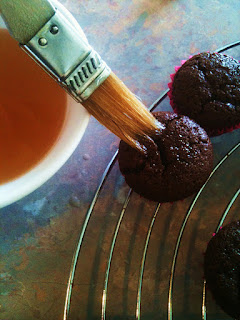
After baking, I brushed them with a watered-down and strained apricot jam syrup, to retain the moisture inside them - not necessary, but it makes them last longer.
Then, to get a smooth-as-silk surface for my fondant decoration, I ganached the tops of the cupcakes, pressing ganache into all the small bumps and cracks to end up with a perfectly smooth surface. This lets you use a very thin layer of fondant while still achieving a smooth surface.
Next came the fondant covering. I used black fondant, coloured with black gel colouring (tip: wear latex gloves when mixing it up). Then I rolled it out thin and cut circles with a cutter a little bigger than the surface of the cupcake.
Attaching the fondant circle to the top of the cupcake with a few drops of water, I burnished it with some clear acrylic like in this picture. This smoothes the top perfectly and gently pushes the edges of the fondant down to meet the edge of the paper liner.
This is the production line showing the next three stages.
On the bottom right is a fondant-covered cupcake. Next it is sprayed with a clear food lacquer (amazing product and worth the money); then a small dot of royal icing is piped or dotted in the middle of the glossed cupcake, to act as adhesive for the skull. Finally the skull is gently placed in the centre.
The scale of the mini cupcake was effective for the size of the skull.
I had a few more cupcakes than skulls, so to finish off, I made some Halloween toadstool rings with some little sugar toadstools that I've had for some time (not home made).
My Eureka moments in making Halloween Skull Cupcakes:
- Diamantes are easy to lose if they fall into the carpet.
- If you're cooking gluten-free, make sure you grease and flour cake tins, and flour moulds, with gluten free flour as well. Don't make your friends hate you.
- Be careful with fan forced ovens because they always cook a bit quicker than you're prepared for.
- If you drop a full glass bottle of blackberry cordial on a tile floor in the middle of baking, allow an extra hour for clean up.
- Try to be extra careful not to get cornflour (for rolling our your fondant) onto the top surface of black fondant because it is very difficult to remove.
Happy Halloween everybody!!!


