Tuesday, 6 November 2012

Light-Up Bomb Cupcakes for Guy Fawkes Day

Remember, remember the fifth of November, gunpowder treason and plot
I see no reason why gunpowder treason should ever be forgot....

Well, that's the rhyme I grew up with, and it's about poor old Guy Fawkes who, it seems, was actually innocent, and didn't in fact plot to blow up the Houses of Parliament. Being a rebellious left-winger who no doubt would have got on famously with Mr Fawkes, I decided to help him along a bit by creating light-up bomb cupcakes for the fifth of November this year:
 They were carrot and walnut cakes topped with cream cheese icing, then decorated with an irregular red 'boom' kind of fiery explosive pattern and topped by a big block bomb....

 ....Which had a sparkler for a fuse, and lit up spectacularly!


I'll get to the cake and icing recipes later, but let's start with the (very simple) process for decorating!
I mixed up some red fondant using gel colour. This is the gel colouring being put on and shows the quantity I used relative to the pize of the fondant piece. I kneaded this until it was a solid red, then broke off a little bit and added yellow colour to get a more orangey shade. Then I kneaded them together lightly to try to get a reddish-orange marbled effect.


As you can see, the marbling didn't really work - the colours weren't different enough. However, I rolled it out and began cutting roughly star-shaped pieces out of it. This was meant to sit underneath the bomb, to give an impression of a fire starting underneath (it also gave the cupcake a touch of colour which it really needed).


This picture shows you the dreadful mess that in the end involved the entire bench, floor and the front of my clothes. However, I did manage to get twelve red stars out of it.


These went onto the tops of the cupcakes and I stuck them down with a bit of water. I also 'painted' the tops of them with water, which is a bit of a no-no usually, because the colour is liable to run and the surface becomes sticky, but I had got so much cornflour on the surfaces during the process of rolling and cutting that they looked really dusty and this cleaned them up.


Then it came to making the bombs. I bought a ready-coloured black fondant for this, because I HATE mixing black fondant - it takes ages and leaves black smudges all over everything.


I hand-rolled balls of black fondant about the size of a big marble...


....Until I had twelve of them, one for each cupcake.


Then I rolled a long sausage of the black fondant and cut it into small cylindrical lengths. I stuck one on each bomb - this is the little bit of the bomb where the fuse attaches.

(I know nothing about bombs, so I have no idea if that is actually right, but this is what I imagine when I picture an old-fashioned bomb.)


The next stage was the sparkler 'fuse'. Obviously, sparklers are a bit long for a fuse of this size so I needed to trim them down. REAL TOOLS (i.e., a pair of pliers) were required for this step....


....And for the next step, which was to trim the top end of the sparkler (the bit that sparkles). I did this very carefully, away from any food, and made sure there were no 'sparkler' crumbs that fell onto the cupcakes - I know they're often stuck onto cakes, but I'm pretty sure they're not supposed to be eaten.

(Safety note: when trimming/using/disposing of the remainders of the sparklers, remember they are flammable and don't place near open flames.)


 The cut-down sparklers can then be pushed gently into the bombs' 'fuse receptors'...


...Until you end up with something like this.


I liked my little bombs all lined up and ready to explode.


The finished result.....


...And again, on a cupcake stand...


....And when the fuse is lit.... voila!


Recipe for carrot and walnut cupcakes with cream cheese icing

Ingredients:

225g plain flour
3/4 tsp baking powder/bicarb soda
2 large eggs
100g light brown sugar
pinch of salt
175ml vegetable oil (I used sunflower oil)
150g carrots (approx 2 medium size carrots), grated finely
200g walnuts
zest of one lemon
zest of 1/2 orange or mandarin


Icing:
125g cream cheese
250g icing sugar
Squeeze of lime or lemon juice, to taste

Set the oven to 180C and line a cupcake tray with cupcake papers.

Beat the sugar and the vegetable oil together with an electric mixer, then add the eggs, one by one, and beat again.

This is the mixture with the eggs added and beaten in.


Stir in the flour, baking powder and salt...


...Then grate the carrots finely - I use a microplane grater because they are fast and get a great, very fine grate.

Chop the walnuts roughly and gently stir in the grated carrot and walnuts.


Then zest the lemon and orange.

I was finding the orange extremely difficult to zest, with very little zest actually making it through to the other side of the zester. This bewildered me....


... Until I realised that I had been 'zesting' a small oval sticker that had been on the skin of the orange.
Way to go, food producers that put stickers on fruit.


Stir in the zests and spoon the mixture evenly into the cupcake cases. Bake for 20 minutes or until golden and a skewer stuck into the centre of a cupcake comes out clean.


For the icing, combine the icing sugar and cream cheese with a fork or beaters, then add some lemon or lime juice to get the consistency and flavour you want.


That's it for the cupcakes for today!
Happy Guy Fawkes Day from Dr Cupcake!!




Thursday, 1 November 2012

Halloween Cupcakes 2: Gingerbread Gravestones

My Halloween efforts this year stretched to two designs (for the other, please see previous post).
I loved the look of the gingerbread gravestone cupcakes in Ms Lili Vanilli's book A Zombie Ate My Cupcake, so I wanted to try them.

Now, this is the point where I go all Martha Stewart on you, and tell you how I painstakingly made my gingerbread gravestones from scratch, lovingly combining the fresh raw ingredients into a dough and carefully rolling it out.... cutting out my shapes and laying them flat on the baking tray all ready to be popped into a hot oven....
Actually no. What I used were these hideous supermarket freaks. So there.


(Okay, okay... if you REALLY want to be a perfectionist, you'll find a good gingerbread recipe and instructions for rolling and cutting it in my previous post on making gingerbread houses, here.)


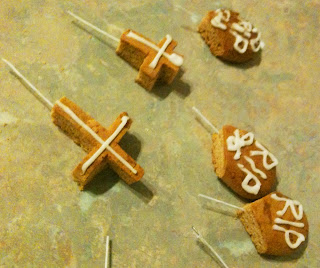
 And so began the Great Gingerbread Man Massacre of Halloween 2012. Both of the horrible 'Gingerbread Kids' with their garish packets and their uneven gingerbready skintone and their cheap, nasty cracked-Smartie buttons were unceremoniously hacked to pieces - very specific pieces, as you see at the top of this pic.

The curved arms were perfect for domed gravestones (I cut them with a point at the bottom so I would have something to anchor them in the icing with) while the cross-shaped gravestones required a little more freehand work.


Two smallish gingerbread figures yielded me five crosses, four domes and heaps of leftover, hacked-up gingerbread pieces. I was too snobby to eat the leftovers. I only eat HOME MADE gingerbread, of course :)

There was a delicious (haw haw) irony in having to dismember poor little innocent gingerbread men in order to make macabre death-themed cupcakes.


The next stage was to decorate the gingerbread gravestones.


This was easily achieved with a very thick mixture of royal icing and a piping bag with the very end of it snipped to create a tiny piping hole.


There wasn't a lot of decoration I could do for the crosses because they were too thin. In the end I settled for a simple cross of white icing to emphasise their shape and provide a bit of contrast.


For my experiments with this batch of cupcakes and their icing, see my previous post here.

I used the piped, cream-coloured ones and smoothed out the piping texture a bit with a spatula, seeing it wasn't quite even anyway, to get a slightly less bumpy surface.


I sieved cocoa over the top to look like earth...


Stuck little florist wires into the bases of my gravestones to provide them with an anchor into the cupcake....


And pushed the gravestones into their final resting place... the soft, cocoa-covered earth.


They made a suitably macabre top for my Halloween centrepiece!

A short note: I decorated these the night before I used them, and sealed them into a cupcake carrier with a load of fresh baked savour muffins and the 'severed ear' cupcakes. All were cool and dry, but by the morning the container had fogged up, and my suspicions proved correct when I tested the gingerbread and found it had gone very soft in that environment. It would have been better to leave them to air dry overnight. However, within half an hour of being taken out of the container, they had hardened up again.


The finished Halloween centrepiece.....

Happy Halloween (again) from Dr Cupcake!


Halloween Cupcakes 1: Severed Ears

Halloween is the season for ghosts and ghoulies and long-leggedy beasties... it is also the time for macabre creativity in the domain of cupcakes....

....like these SEVERED EAR cupcakes!!!


Now I have to admit to something here: my creative Halloween juices had barely started flowing (arterially spurting??) before I chanced upon this amazing book. Yes indeed! A Zombie Ate My Cupcake, by Lily Vanilli, absolutely full of ghoulishly shocking designs!!

So I have to admit that I got derailed on this one, and both of my Halloween cupcake offerings this year are from designs by the amazing Ms Vanilli.


I decided I HAD to try some severed ears as a topping for a cupcake. Van Gogh would have been proud. So the first step, obviously, was to come up with some ears:

Ms Vanilli does not include detailed instructions of how to make ears, so I started with the obvious decision....


... Take a photo of my OWN ear. I needed to use SOMETHING as a model. If you'd like to use my ear too, you're welcome - ear modelling comes for free from Dr Cupcake.


The next step was to mix up some shell-pink, ear-coloured fondant icing.
For instructions on how to mix gel colouring into fondant, click here.


Then I pulled off a small piece, about the size of a walnut, and rolled it into an oval shape.


I then hollowed this out with my finger....


... gradually creating a rim around the right-hand edge and a deepening curve in the centre.


I used the rounded end of a small plastic fork (but you could use anything similar) to help me get the rim all rounded and hollowed out.


So you then end up with something a bit like this:


From here, I started to try to copy the contours in the inner ear from the picture of my own ear. This was quite tricky.


Each ear turned out a little differently, but basically this was the finished product, which then just needed to be left somewhere dry and shady to harden up.


This shows you how the ears all ended up slightly different to each other. The one on the right is HIDEOUS, isn't it? Sorry 'bout that.


I then decorated three out of the six ears with little silver studs. I wanted to also make some little gold rings, but I didn't think I would be able to make them of fondant without them looking a bit clumsy so I just went with the 'plain' look for the other ears.


Having done the ears and left them to dry (I left them to air dry for a few days, but they would have been fine to use within an hour or so) I needed some cupcakes, of course.

I haven't used a 'cupcake mix' since I was about 12, but I had a special purpose for trying this one: it is both gluten-free and dairy-free, and several of the intended recipients needed this to be the case. My experiments with doing my own recipes for these dietary requirements are a little haphazard, so I did think I would try Macro's Gluten Free Cupcake Mix (pictured).

All that needed to be added were two eggs and a couple of tablespoons of vegetable oil. As you see this produces a light fluffy pale-coloured mix. Uncooked, it tasted okay, although it was disturbingly textured - almost gritty, in the way that rice flour can be.
I should have taken a pic of the cupcakes as they came out of the oven but I forgot. Anyway, they were better than I expected: they cooked evenly, rose smoothly and tasted nice, and were very light, in the way that shop-bought cupcakes made with confectioners' flour often are.

The packet icing mix which was also gluten and dairy free (when made up with Nuttelex or a vegetable based margarine) is the yellowish, loosely-piped icing in this picture. I found it only made enough icing for seven cupcakes....
...So I had to improvise with the rest, and, goddammit, I had no icing sugar in the house...

I substituted with royal icing. This produced an ultra smooth, glossy icing that (warning, Will Robinson, warning) tends to start off quite hard and goes softer, and has a tendency to run off the edges of the cupcake, as you see in one of the cupcakes above.


This horribly blurry picture shows the next stage: attaching the ears to the top of the cupcakes.

Of course, severed ears need some blood, and some glossy gel icing in the appropriate colour was just the ticket.


I really just placed the ears on top of the cupcakes rather than 'attaching' them. I squirted 'blood' all down the side of the ear, then freehanded some little blood trails in the icing, just for extra shock value.


They made for an impressively bloody Halloween centrepiece!

Happy Halloween from Dr Cupcake!!