Sunday 13 February 2011

Valentine's Linzer Sables

A yummy Valentine's Day version of a very old European favorite!
One of my favorite cakes when I was growing up was Linzer Torte, an Austrian cake from the town of Linz which according to the interwebs is the oldest cake recipe known, dating from 1653. 


Linzer Torte is a really rich, dense cake with ground hazelnuts, cinnamon, cloves and lemon rind which has a latticed pastry top and a filling of blackcurrant jam.


There was an awesome Austrian cake shop in Melbourne called Fleischer's, it used to be on Chapel St and then moved to Glenferrie Road. They made the Linzer Tortes I know and love. 


Linzer sables are a biscuit version of the torte, same flavours, just a bit crunchier!
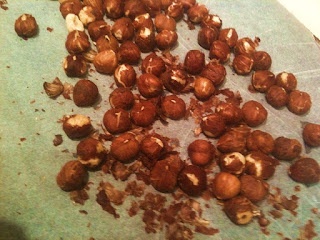
To get the best flavour from the hazelnuts, roast them in the
oven for 5 minutes and then rub the brown skin off. 


I'll put this out there straight away, these were a nightmare to make.

The pastry is very short (a large proportion of butter or 'shortening' to the dry ingredients) and this makes it incredibly fragile and prone to cracking and disintegrating when handled. It sticks to rolling pins, benchtops and just about everything else too.


It wouldn't roll out at all because it cracked and split immediately when I even waved a rolling pin in its general direction.

In the end I had to flatten it out roughly by hand and then smooth the top with a spatula. See the unevenness in the picture, pre-spatula :-(

Of course, while I was flattening the top out with the spatula, the bottom was busy sticking firmly to the bench.


So then the spatula had to be wedged underneath to loosen this soft, crumbly mixture from the surface underneath so that I could stamp out my heart shapes.

Half of the shapes were plain large hearts.

The other half were the same large heart cutter but I also stamped a tiny heart cutter to create a cut out space in the middle of the sable, see picture to the right.

This is so you can see the lovely dark jammy goodness inside.

It took a lot of time and patience to get the sables all cut out and onto oven trays :-/


After spending so long on rolling and cutting, I was paranoid that they would go wrong in the oven, but no! A quick ten minutes and VICTORY!!

They were very slightly puffed and still malleable when they came out of the oven, I was so fearful to disturb these temperamental baked goods that I left them on the trays for ages before being brave enough to transfer them to a rack to cool.

It's worth all the fuss, they are melt-in-your-mouth crumbly and hazelnutty and sweet. Happy Valentine's Day!


Recipe from 500 Cookies by Phillipa Vanstone

  • 150g roasted skinned hazelnuts
  • 300g plain flour
  • 100 g granulated sugar
  • 1/4 tsp salt
  • 2 tsp ground cinnamon
  • 1/4 tsp ground cloves
  • 225g unsalted butter
  • grated zest of one lemon
  • 50g blackcurrant jam
  • icing sugar to decorate
Set the oven to 175C. Grind hazelnuts in a food processor until fine, then add all other ingredients and pulse until the mixture clumps together. Flour a work surface and roll out the pastry (good luck!!). Cut shapes, making sure you have even numbers of each shape. Cut holes in the centre of half the shapes to make the 'jam holes'. Transfer the sables to trays lined with baking paper, handling them carefully to ensure they don't crack. Bake sables for 8 to 10 minutes. 
Sandwich the cooled sables together with blackcurrant jam, pressing down carefully to make the jam rise through the centre hole. Sieve icing sugar over the top just before serving. 
Filled cookies keep for up to 3 days, unfilled keep for over a week in an airtight jar. 

Kids DIY cupcakes at Festivale

At Festivale this year there was a wonderful stall in the kids area which can best be described as 'DIY Cupcakes'.

You paid your four bucks and got to choose one of about 8 patterns. You then were given a plain undecorated cupcake, you took this to the 'buttercream station' with your chosen pattern and they dolloped the right colour of buttercream on your cupcake...

... giving you an icy pole stick to spread it, and a little bag of pre-cut decorating items like marshmallows and licorice. 

The picture shows my chosen pattern which was a very cute bunny with scary black whiskers. 


So I took great pleasure smoothing my buttercream to the smoothest smoothness possible and sticking on the little bits 'n bobs of decorating things... the result I achieved was pretty much what the picture indicated... if anything the whiskers were scarier than advertised. :-/

I undertook this activity with two small friends of the O'Byrne variety who were equally as excited as me at making their cupcakes, and equally careful in their decorating skills. 

In fact they had the jump on me because their little fingers were the right size to handle the tiny ingredients. 


 I loved this design of two teddies marooned on a desert island, complete with a cocktail umbrella to protect their delicate teddybear fur from the hot sun. They look pretty happy with their tropical paradise.


The happy trio with their decorating efforts.

Their mum, my friend Michelle, tells me that this DIY cupcakery idea is starting to take off at little people's parties... there is a whole scene out there that I have been unaware of up until now!!

Thanks girls for sharing your DIY cupcaking experience with me and thanks Michelle for the photo!


Monday 7 February 2011

Lots 'n' lots of piggywig cupcakes!

A whole STY of piggywigs for morning tea at work this week!
"And there in the wood a Piggy-wig stood, with a ring at the end of his nose, his nose, with a ring at the end of his nose."

Although I love this quote from The Owl and the Pussycat it makes me wonder if I should have put little rings in the noses of my piggywig cupcakes.

Farming question: do piggywigs have rings in their noses these days??

These piggywigs are waiting expectantly for Tuesday morning tea at work. I chose this design because it's simple and quick, an advantage because on this occasion I needed to make a fair few of them and had limited time.

Piggywig uses one large round cutter to cut out the face. His snout is hand shaped by rolling a ball of fondant, then flattening it a bit top-to-bottom and upward-downward. The snout is stuck on to the face with a few drops of water, and you can use the end of a little paintbrush to make the dents for the nostrils.

The eyes are tiny balls of black fondant placed in tiny holes made by the smallest size of ball tool and moistened with a drop of water to stick them down.

The ears are stamped out with a little triangle cutter, but if you don't have one you could cut triangles with a knife.
This is the production line of piggywigs getting their snouts and ears and eyes put on.

I also brushed some rose petal dust (diluted with cornflour) onto the cheeks, to give them that rosy blush. I put a little on the tips of the ears too but it's a very subtle effect that is hard to see in the pics.

A warning, I cut the ear triangles and left them to dry for a short while because they were so soft that it was difficult to stand them up. But when they had dried a bit, they were much more likely to crack and have an uneven surface. I'm not really happy with the ears, would welcome advice?


A note on colouring the fondant, start off with a really tiny amount of colour. The amount of colour shown in the pic below left was actually too much for this quantity of fondant - I had to add that much fondant again to get the colour down from a very hot pink to a piggy pink. That's why the fondant seems to have 'expanded' in the pic below right.


Oink oink, happy eating - and if you were wondering, OBVIOUSLY all these piggywigs are free range.

Sunday 6 February 2011

Coconut macaroon madness

No macaroony blog would be complete without coconut macaroons! 

When I think of macaroons, I always think of French macaroons, which I guess we should all call 'macarons' except it sounds a bit poncey. But there are other types as well and coconut ones are often found in England, Scotland, the USA and Germany. 

The interwebs tells me that Australians put jam in the middle of their coconut macaroons but I think they're just trying one on - I've never seen that. 


By the way, the interwebs also tells me that the word 'macaroon' comes from the Italian maccarone, or maccherone, a verb meaning to crush or beat - because you need to crush the almonds so finely. Before food processors were invented this would have been a bummer of a job, no wonder they named the end result after it. 
Anyway, coconut macaroons start off with a basic meringue of whipped egg whites and sugar.


You add a bit of almond meal, a lot of coconut and get a sticky, moist mixture that you shape roughly into balls. It's hard to do neatly because the coconut bits stick out everywhere.

I used Nigella Lawson's recipe from How to be a Domestic Goddess, thanks Nigella.

She gives quantities for 8 largeish macaroons... I needed about 30 small ones, so I doubled the mixture... and ended up with 66!!

So Nigella's macaroons must be the size of a small Shetland pony.
2 large egg whites
1/4 tsp cream of tartar
100g caster sugar
30g ground almonds
pinch of salt
1 teaspoon vanilla extract
250g shredded coconut

Set oven to 170C. Beat egg whites until frothy, then add the cream of tartar and beat to soft peak. Add the sugar gradually until the mixture is at hard peak and glossy. Fold in all other ingredients and spoon onto baking trays lined with baking paper. Bake for 20 minutes.

Coconut joy!

Thursday 3 February 2011

Portrait cupcakes

It's a small step from doing 'people' cupcakes to doing actual portraits of people you know. This is an off the wall idea for thank yous, birthdays or other occasions where you really want someone to feel special.
Warning, they may just end up thinking "What the?!.... my face isn't that round... and is my nose really that pudgy??!"

So pick your audience, but hopefully they will get a laugh out of it.

Quick tip is that it really helps if they have some distinctive feature, like long dark hair or massive eyebrows or glasses or a beard... there are limitations to portraiture accuracy on a cupcake so you need to have some simple feature that stands out and says to them that this isn't just a random 'face'.


I did these because I wanted to say thank you to some very talented and generous people who opened the amazing MONA (Museum of Old and New Art) in Hobart. It was a question of what do you give someone who has everything, I thought a set of cupcakes with a picture of each of the prime movers and the lettering that makes up the MONA branding would maybe raise a smile. Who can say no to a cupcake!


This is the final presentation. I stuck the bases down with museum gel (this was not a deliberate reference to their museum, just an old curators trick of using it whenever you want something to stick fast but be removable).


Oddly enough the faces weren't the most difficult bit. The lettering was. This was because I wanted to copy exactly the particular font and colours of the MONA brand.

I ended up tracing them from a MONA catalogue onto baking paper, then placing the baking paper on top of rolled fondant and scoring through it very gently with a knife. Then I removed the paper and cut the scored lines.

One tip is leave the letters half cut out - as in the picture - to harden up a bit before you try to remove the void spaces. Otherwise they will stretch and deform.

The 'O' was cut using two sizes of circle cutter.

Wednesday 2 February 2011

Melting moments and ricciarelli: flour and butter v almonds and eggs

If we put macaroons on one side for a minute – I know it’s hard – my other favourite bickies are melting moments and ricciarelli.

Melting moments are apparently an Australian invention based on Scotch shortbread, they were first mentioned in an Australian cookbook from 1928. 
 
 They contain the same ingredients as traditional shortbread (flour, cornflour, sugar, butter) but whereas shortbread is baked in slabs or ‘cakes’ and stamped with a pattern, melting moments are small bite sized drops.

At some stage after the 1950s they began to be sandwiched together with jam or icing.

I like using a vanilla flavoured biscuit with a sharp lemony icing/filling. The icing is butter, icing sugar and lemon juice. It needs to be spreadable but stiff, so that it dries hard and sticks the bickies together. 

My recipe is from a book called '100 Cookies' but you can google recipes, they are all pretty similar. 


Ricciarelli (pronounced ‘richie-a-RELli’) are a type of macaroon I guess. They are Italian biscuits made of ground almonds, sugar and egg white and they are moist and chewy rather than crisp’n’crunchy. They can be flavoured with lemon rind which works really well. 
 

I just googled the name and I found out they are named after an Italian prince, Ricciardetto della Gherardesca from Volterra, who apparently invented them when he came back from the Crusades in the 14th century. 
I am now imagining a knight in full armour clanking around a massive castle kitchen trying to grind almonds really finely while Baldrick beats the egg whites. 


Anyway, here in the 21st century there is a great recipe for them in Nigella Lawson’s How to be a Domestic Goddess cookbook, thanks Nigella. You get a very sticky mass that you need to hand-shape into diamonds (using icing sugar to stop them sticking to your hands) and place on a baking tray to harden up before baking. 
You are supposed to leave them overnight but I always get impatient and try to bake them same day. 


Here is Jade helping out in the process by trying to speed up the drying with a hairdryer.

Unfortunately it didn’t really work and while you still end up with yummy biscuits, they look swollen and malformed, not the little neat diamonds that you want. So, always best to follow the recipe – sigh.

Friday 28 January 2011

Friday night caramels

*Grandparental advisory: do not give these caramels to your nan. They will pull her fillings/false teeth out and it will be very embarrassing for everyone involved*

These remind me of my Grannie Gracie actually, not quite sure why - she never made anything like this. But she always used to line her cake tins with heaps of paper and I think wrapping the caramels in twists of baking paper like I did was what made me think of her.


caramel setting in the moulds


Thanks to the Frankie Sweet Treats cookbook for the recipe and Instagram for getting across in picture form the old fashioned simple quality of the caramels.

Only ingredients are brown sugar, castor sugar, glucose syrup, condensed milk and butter, boiled to soft ball stage (115C).


It hardened quite quickly in the mould. I turned it out when it was still warm and cut it into squares with an oiled knife, then hand-shaped them into oblongs. The consistency when cool is very firm, but will yield when pressed between thumb and forefinger.
I am looking forward to taking these in to work on Monday and finding out which of my co-workers has loose fillings :-)


Recipe:
1/2 cup brown sugar
1/2 cup caster sugar
3/4 cup glucose syrup
3/4 cup condensed milk
1/4 cup unsalted butter
pinch of salt

Line a rectangular container with greaseproof paper.
Combine all ingredients in a saucepan over low heat, stirring, until the mixture comes to the boil. Increase the heat to medium and boil until you reach 115C or soft ball stage (about 10-15 minutes). Stir constantly, the mixture is very prone to sticking to the bottom of the saucepan and burning. Remove from heat and pour into containers. When the mixture has cooled and firmed up, cut into squares with oiled scissors or an oiled knife. Wrap in twists of baking paper.