Tuesday 3 September 2013

Tasmania's seafood (and Dr Cupcake's total obsession with it)

It's time for Dr Cupcake to depart from the normal theme of sweet things, and venture into some more savoury territory. There is a very good reason for this: the amazing quality and abundance of fresh fish and seafood in the marvellous island of Tasmania which I'm lucky enough to call home.


Tasmania was into seafood in a big way long before it was cool. My Dad, hailing from Melbourne, was mystified to discover 'scallop pies' on an early trip to Tasmania in the 1950s - he'd never had a scallop before. Now, scallops appear on every truly ritzy menu in the world... and country pubs in Tasmania STILL have 'Scallop Pie' as a popular special on their blackboards. What a place.

Tasmania's seafood scene is not just about scallops. If you're lucky enough to live here, you're presented with a wild abundance of cheap, fresh-caught or sustainably-farmed mussels, oysters, squid and octopus, salmon (fresh or beautifully hot or cold smoked), trevalla (or blue eye), stripey trumpeter and sashimi grade tuna. No wonder that Japanese luminary chefs like Tetsuya Wakuda come to hang out here - and that the brilliant Maasaki Koyama, in a cultural twist of fate, has set up the most amazing sushi shop in Geeveston, Tasmania's Deep South. I actually plan my life around Maasaki's attendance at the Hobart Farmer's Market... his occasional use of fresh sea urchin roe, trumpeter and other incredible sashimi goodies makes the market the best place to be.

If you've made it this far I'll assume you're a convert and talk openly about my obsession with smoked salmon, which is quite possibly the most heavenly food in existence. Its amazing mix of salty tang, its shimmering coral colour, its soft but firm texture is truly special. I have yet to come across anyone who doesn't like it - although apparently, Scottish indentured workers in the nineteenth century got so sick of eating smoked salmon that many of them had it written into their contracts that they could be given it a maximum of once a week. 

Here is my homage to Tasmania's seafood bounty - a few pictures and descriptions that come mostly from my own imagination and occasionally borrowed from others - hopefully they will inspire you, whereever you are, to look at seafood again and remember that it's not 'difficult'. Instead think 'I can do that!' And enjoy the wonder of the sea...

Salmon three ways. 

From top, clockwise:

Hot-smoked salmon with rocket, avocado, lemon juice and olive oil.

A teaspoon of hand milked salmon caviar, with a dollop of creme fraiche and a sprig of dill.

Whisky cured smoked salmon with a salad of purple carrot, bean spouts, radish and shaved lettuce, with an asian hot sour dressing.


Squid ink fettucine marinara. 

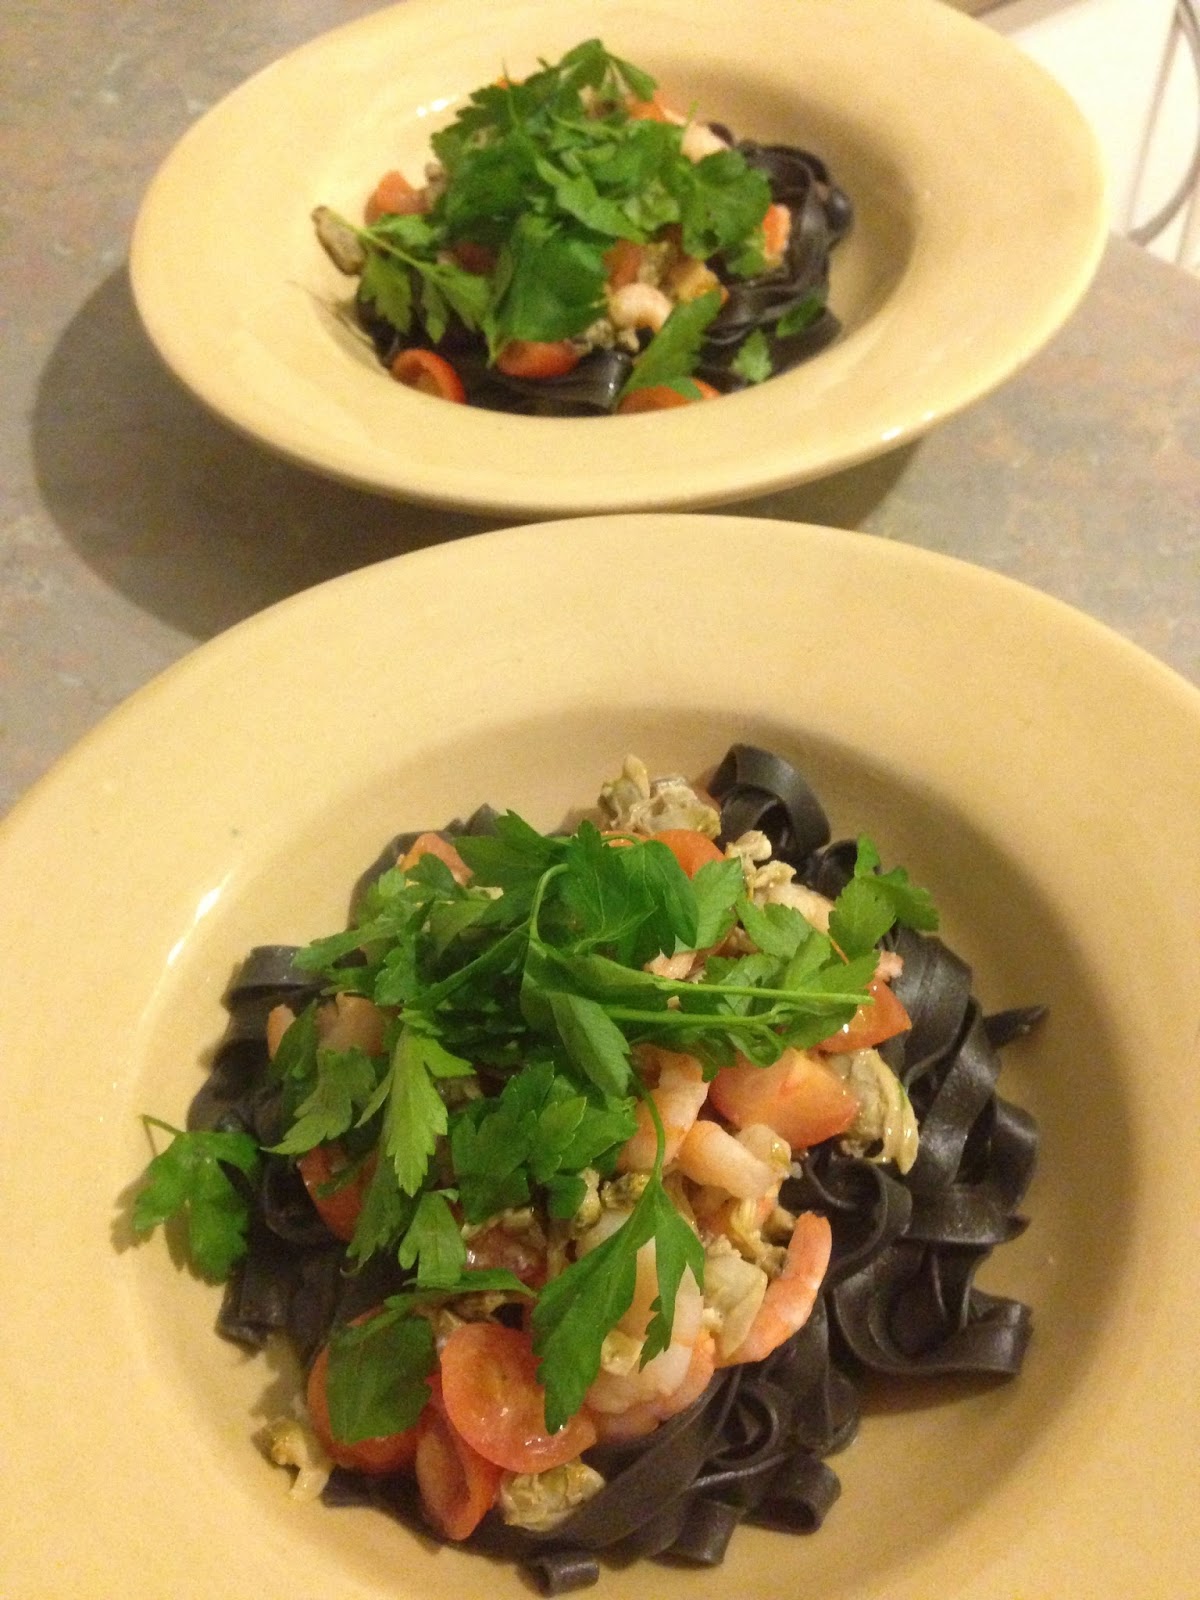
Home made fettucine with squid ink, topped with Tasmanian king prawns, scallops and mussels with Italian parsley. A light dressing of olive oil and garlic.


Seafood tasting plate (1)

Clockwise from top:
Hot smoked salmon with pea spout on a cracker.
Finger of cold whisky-smoked salmon with pesto.
King prawns with fresh basil and mayo.
Scallop in shell with pepper and dill.
Honey-cured smoked salmon slices on creme fraiche.
King prawn with lime wedge.

(Centre)
Bunch of redcurrants.


Seafood tasting plate (2)

A slightly simpler iteration, using very similar ingredients than above.

Clockwise from top:

Hot smoked salmon with a dill and pepper yoghurt.
Rolls of whisky cured salmon with mustardini (mustard sprouts).
Shards of Italian croccantini garnished with viola flower.
Salmon caviar with lemon wedge and pea sprout.

Baby whiting fillets, crumbed and fried

For anyone who says Tasmanian seafood isn't cheap... It cost $1.20 to buy these little whiting (at least, I think that's what they were).

They were sold as whole fish, and yes, they needed to be scaled, gutted and filleted. But I got the amazing Rohan to do the scaling and gutting, and it took me about a minute (and a very sharp knife) to fillet them.

They were completely awesome when crumbed and pan fried, served with a few lemon wedges, parsley and tartare.

An entree for two = $2.50 (including the lemon).
As a main? $5 for two. Now, THAT'S cheap. I love Tassie.

Seafood chowder. 

Tasmanian fresh-caught prawns, mussels and scallops, cooked in a thick broth of Tasmanian Dutch Cream potatoes, fish stock, and fresh Italian parsley.

And LOTS of pepper.


Seared tuna with daikon. 

Sashimi grade tuna served two ways:

(Bottom of plate) Ribbon of sashimi tuna, sparsely sprinkled with soy sesame dressing.

(Middle of plate) Seared tuna, coated in toasted sesame seeds and sprinkled with nigella seeds, on a bed of shaved daikon radish, with a soy sesame dressing. Lime, pickled ginger and wasabi on the side.


I hope you've enjoyed this little journey through the fabulous seafood of this island... Please, go out and experiment... find your own unique and wonderful way to enjoy the fruits of the sea!

Monday 3 June 2013

Announcing... A new Dr Cupcake Workshop!

Yes - it's another brand spanking new DR CUPCAKE WORKSHOP!

*****DATE CHANGE*****

Dr Cupcake's Portrait Workshop will teach you how to make three fantastic little cupcake 'portraits'.


Come along and learn how to make expressive and engaging 'faces' using fondant icing, and take three amazing cupcakes away with you at the end of the workshop to gift to friends or keep.

The possibilities are endless!!


And, while we only have time to create three portraits on the day, the skills you learn will allow you to adapt hairstyles, expressions and features to make any portraits your heart desires!
So come along, learn a new skill and have a fabulous afternoon full of fun and cupcakes!


 Location:  Salamanca Arts Centre Meeting Room, Salamanca Place, Hobart
Date: TO BE CONFIRMED (Winter, 2013)

Time: TO BE CONFIRMED

Cost: $60 adult, $45 under 18 or concession

What to bring: yourself and an apron. Cupcakes, equipment and everything else is provided.

Bookings and further information / date confirmation: email wootton.astrid@gmail.com

Be quick - spaces are limited!


Saturday 13 April 2013

Citrus fusion: an orange marmalade cake with lemon glacé icing

I've made this orange cake before but I've never combined it with lemon glacé icing before. It turned out to be the perfect combination. The cake is dense, rich and syrupy, and the tangy, thin icing cuts through the richness perfectly.

I decorated it with a few fondant flowers. This is a simple, plain sort of cake, and you don't want to get too fancy with the decoration. A few flowers are fine.


This recipe is very simple:

Ingredients:
3 eggs
100g ground almonds
50g caster sugar
1 tsp baking powder
175g orange marmalade


Preheat oven to 180C and grease a loaf tin. Beat the eggs with an electric beater for five minutes, until they are thick and creamy.

Then add all the dry ingredients and the marmalade, and fold through the egg mixture until well combined.

You should end up with a foamy, loose mixture. Pour into the tin and put into the oven immediately. Bake for 30-35 minutes or until a skewer stuck into the centre comes out clean. If the cake starts to brown too much on top before being ready, cover its top with foil and reduce the oven heat a little.


The cake will rise, then sink in the middle - to get a flat top on the cake, reverse it when taking it out of the tin.


Glacé icing:

200g icing sugar
1 -2 tblsp lemon juice
lemon zest (if desired)

Mix the juice in with the icing sugar and stir until smooth. Adjust for desired thickness/runniness by adding more juice or more sugar.


When cake is cold, dollop the icing onto the cake and smooth it out with a spatula. I like mine to run down the sides of the cake in some droplets and look a little home-made and rustic - use lots of icing for this look.


For the fondant flowers, if using, you'll need some coloured fondant, a small rolling pin and some flower shaped cutters.

Roll out a small piece of fondant, using cornflour to prevent it sticking. Stamp the fondant with the cutters, then add a cachou to the centre of each flower, fixing it with a drop of water.


Once made, these flowers will last for months in an airtight container. Make sure they're completely dry before sealing the container, though, or the flowers may go soft.

A small amount of fondant will make lots of flowers, so it's worthwhile doing a big batch once in a while and keeping them for use in decorating.


That's it for the orange marmalade cake - good luck and happy eating from Dr Cupcake!

Friday 12 April 2013

How to make the perfect peanut butter macaron

I was delighted with my first attempt at peanut butter macarons, so I'm being very bold and calling them 'perfect'.
A perfect macaron should have two crisp, shiny circular biscuits that are smooth on top and have a bubbly, risen 'foot' at their lower edge, sandwiched with a smooth cream.


Macarons should be a triumph of both flavour and texture: Flavour should be delicate and the sweetness of the biscuit should be balanced by the smooth, creamy filling. The crisp and crunchy surface of the biscuit should also be balanced texturally by a chewy centre in the biscuit and the silky texture of the buttercream.


I have made chocolate, rose, coffee and pistachio macarons before, but until now I had never been adventurous enough to try a peanut butter flavour. It worked beautifully.

The links above give you lots of tips and trick, but since it's been a while, I am going to run through all the steps.

Firstly, the ingredients:

Macarons: 

200g ground almonds
200g icing sugar
160ml egg whites, divided equally into two lots of 80g
200g caster sugar
75 ml water

Buttercream: 

100g softened butter
100g smooth peanut butter
100g icing sugar
2 tblsp milk


To make the macarons, start off by tipping the ground almonds and the icing sugar into a food processor and blitz it for about a minute - you want it to be very, very fine. Then sieve this mixture into a bowl and set aside.


Place the caster sugar and the water into a small saucepan and, without stirring, boil the mixture until it starts to thicken into a syrup, You can see this stage taking plac when  the texture changes, the mixture becomes thick and syrupy, and the bubbles become slow and sticky.

As the syrup boils and starts to thicken (it will take five minutes or so), beat 80g of the egg whites to hard peak. When the eggs are at hard peak and the sugar syrup is thickened but not coloured, pour the syrup into the egg whites in a thin stream, beating constantly. Continue beating for a few minutes while the mixture cools down a little.


Mix the other 80g of egg whites into the ground almonds and icing sugar mix. Beat until combined, then add any flavourings.


For this recipe, I put in a capful of Café Trablit, a French coffee flavouring, because I thought this would go well with the peanut butter flavour, but you could use vanilla essence or not add any flavouring at all.


Tip a quarter of the meringue into the almond and sugar paste and stir briskly to lighten and thin this mixture. Then gently fold the other three quarters of the meringue into the mixture with a spatula. Take care not to over stir.


Scrape the mixture into a piping bag (I use disposable plastic piping bags, but you could use a sandwich bag with one corner snipped off).


Holding the bag vertically with the point downwards, pipe even circles onto a baking sheet lined with baking paper. Do this by squeezing the bag firmly straight downwards and allow the mixture to spread outwards from the middle.


Try to keep a bit of distance between each macaron. These are slightly too close together, and some of them swelled and ended up joined. It's annoying when this happens, because it can really affect the look of the macarons.


I had a mini-whoopie pie pan that I wanted to try for macarons. I thought the size of the indentations was about right, so I thought it was worth a try. Unfortunately, it didn't work - I'll show you the results below.

After piping all your mixture out, DO NOT put the tins in the oven!! Leave them to set and form a 'skin' at room temperature for 30 minutes. Meanwhile, turn the oven on to 150C to heat up.


....And you may wish to start on the clean-up.

Yes, this is the state in which my hand, the piping bag and the bench ended up after piping the mixture out.


This is a close up of the bench. And no, I don't really know how so much mess is even possible.


Do I remember piping a macaron straight onto the bench top? No, I do not. Nevertheless here it is.


Annnnd these are the stacks of dishes.

Suffice to say, by the time you have cleared up, it will be just about time to put the macarons in the oven.


Put them in the oven for 14 minutes. At the end, the macarons should be 'risen' with the tops glossy and hard, and the 'feet' sitting a few millimetres shy of the base. The 'foot' is the part of the macaron that looks rough and bubbly, at the base of the biscuit.

Take out of the oven and slide the entire sheet of baking paper off the baking sheet and onto a dampened bench top. Leave it for a few minutes before peeling the macarons off the baking paper and putting them on a rack to cool - the slight moisture underneath helps them to un-fasten from the paper.


I knew the mini whoopie pie tin ones wouldn't work as soon as I saw them. They were clearly going to be an odd shape...


And indeed it was the case. They looked... well.... they looked a bit like whoopee pies!


Added to which, many of them did not come evenly out of the pans....


And the ones that did looked so awful that I had to discard them.


The finished macarons should look rounded and regular, not grainy. I work off the principle that about 15% of any batch will be discarded - each batch makes heaps, so it's worthwhile being discriminating and only bringing to the table the most perfect ones you have!


As the macarons are cooling, you can make up the peanut butter-cream. Combine the butter, icing sugar and peanut butter and beat until you have a stiff cream (I do this by hand - the old-fashioned way). Add enough milk to make a smooth, pipe-able buttercream.


Scrape the buttercream into a piping bag and snip the end off.


Arrange the cooled macarons in pairs, taking into account the need to match them for size, and pipe a circle of buttercream onto one half of each pair. Then sandwich the pairs together by pressing the top down gently on the cream to join it to the bottom.


The cream should spread out to the edge of the biscuit, but not bulge over the edge.


You should end up with lovely, even, sweet and texturally-beautiful macarons.


They can be stored in a sealed airtight container in the refrigerator for up to a week.


What else can go wrong? Well, there are a few errors that can creep into any batch - but hopefully, if you've followed the instructions carefully, your problem will be minimised.
My macarons are cracked or misshapen. 

This can happen when you don't leave them to form a skin at room temperature for long enough. But I always get a few in each batch that look like this. If it's a problem with more than a few, leave to set for longer next time.


My macarons have stuck together. 

Next time, pipe them a bit further apart. If they are not too fully joined, you can separate them with a sharp knife - if they are very fully joined, they won't look good even if separated.


Hope that helps!!
Best wishes from Dr Cupcake!