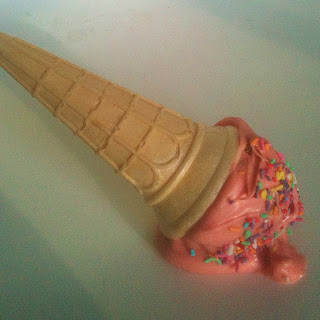
There's something childlike and charming about making things that look like other things. Ask Heston Blumenthal, who specialises in it. Not that I'm comparing myself to the Great Man - but I did have a lot of fun making these icecreams (which aren't).
The cones are real mini cones, but the icecream is actually a thick layer of pink-tinted chocolate with a lush interior of crumbed orange and almond cake mixed with lemon cream cheese icing.
Huge thanks to Angie Dudley, a.k.a. Bakerella whose awesome book Cake Pops this idea came from.
No childhood fantasy would be complete without its dark side, the ultimate childhood disappointment of a dropped icecream.
I remember the devastation of dropping an icecream on the pavement when I was about four, just as I had walked out of the milkbar. It was the worst moment in my life that far. So making these 'permanently dropped' icecreams was quite cathartic for me.
So these are the start of the icecreams - surprising as that is.
The balls are made from an orange and almond cake (for recipe see here) , crumbed and mixed with a little lemon cream cheese icing.
I must admit I had a bit of trouble crumbling the cake mixture because it was too moist, so it sort of squished rather than crumbled. I guess I shouldn't have added icing to it then, because I knew that would make it even moister, but you know, I did. And ended up with, well, sludge. Nice tasting sludge.
Needless to say, it was a hard job rolling it into balls. A fridge was involved for several hours before rolling, and a freezer was required for several hours thereafter.
Next job was the pink coating. This marvellous substance is Wilton's Candy Melts, a mixture similar in taste to white chocolate but tinted in different colours. It comes in packages from cake decorating stores (in Hobart, try Habitat or Spotlight for a start). For this project I got pastel pink and some dark chocolate melts which were mint flavoured.
They melt well in the microwave if heated gently, on 50% heat, in small bursts of a minute or so.
When the pink melts are smoothly melted, stick a dipping fork, knife, or skewer into a cake ball and lift it gently into the melted mix.
You need to push it right into the mixture and use a knife or spatula to push the mixture right up the sides to cover the whole ball.
Then gently tap the fork on the side of the ball to make any excess mixture drip off and get a smooth texture.
As soon as the ball is dipped, drop it into a waiting cone. If there is any cake ball visible where you've pulled out the fork, use a little more melted mixture to patch the hole. The mixture will dry quickly and stick the ball to the cone.
I also sprinkled a few sprinkles around the edges of the pink topping at this stage, avoiding the centre because that will be covered up later.
So after a few dips and sprinkles you'll end up with some quite realistic little cones.
Usually with cake pops the aim is to get the coating as smooth as possible, but with these, I don't think it matters because any swirls and drips just look like the icecream is melting, and, if anything, makes it more realistic!
If you are going to take macabre delight in creating some dropped icecreams, now is the time. As soon as you dip the balls and put them on the cones, sprinkle liberally with sprinkles and then upend them at an angle on some baking paper.
It looks even more effective if the coating on these ones is liberal so that it spreads out a bit, just like icecream does when it hits the pavement. I have an exact memory of that particular image :-(
By now, the pink coating is probably dry so it's time for the chocolate topping. Because as we all know, an icecream without chocolate topping isn't really an icecream at all.
Melt some dark chocolate melts (I used mint flavoured ones) - you don't need much - and get your sprinkles ready. I also laid out some red and orange mini M&Ms, for the 'cherry' on the top.
Using a teaspoon, drop some chocolate mixture onto the top of the cone.
Shake the cone slightly from side to side, to get the chocolate to spread a bit unevenly, or use the spoon to smooth it down a little, You're aiming for the look of chocolate syrup having been squirted on the top from some big canister at the back of Wendy's Supa Sundaes.
Then top it with a mini M&M.
Then take a pinch of the sprinkles and drop them over the cone.
Return the cone back to its position to dry and repeat with the other cones.
You may ask where I got a stand that happens to accommodate mini icecream cones. It's actually a vintage 1970s 3D tic-tac-toe played with marbles, courtesy of my Dad. The holes are to hold the marbles but they happened to be the perfect dimension to hold mini cones. Serendipity.
So there you have it... faux icecream cake pops, brimming with orange cake, cream cheese icing and chocolate.
Enjoy!


