Babies with dummies – for no reason other than I thought they were cute :-)
This design is courtesy of Paris Cutler of Planet Cake.
I guess they would be good for a new birth or a baby shower but you’d have to check whether the mother to be was cool with sinking her teeth into a cakey baby... personally it wouldn’t bother me but some are more sensitive about cannibalism :-)
This weekend I wanted to experiment with some new recipes for friends and colleagues who are gluten- and dairy- free.
I ended up with gluten-free/dairy-free two ways: an original Dr Cupcake recipe of a cherry ripe cupcake, made with the juice from stewed cherries, and a Jaffa cupcake, made with orange marmalade.
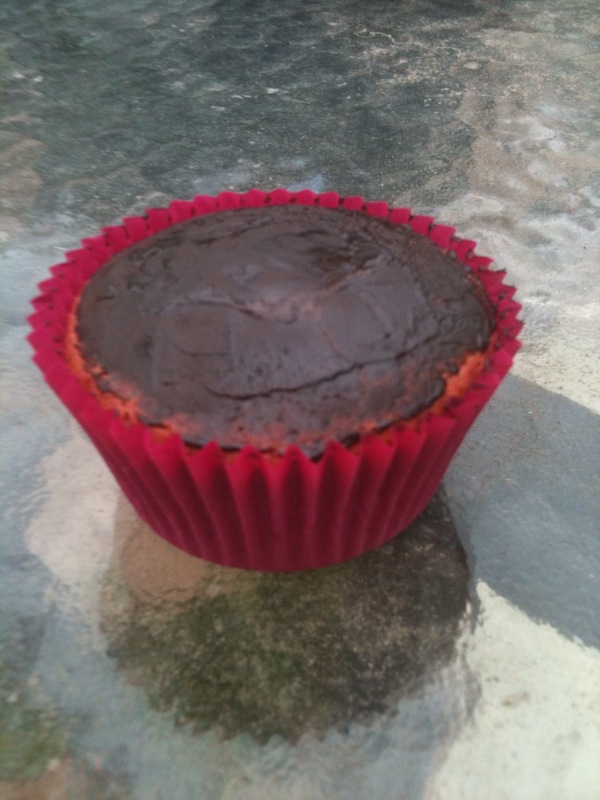
Both have a topping of 70% dark chocolate to give them a nice even surface and make them extra yummy!
Recipes below, first to the decorating:
First you need to cut large circles from flesh-coloured fondant for the top of the cupcake.
To get a lovely ‘flesh’ tone, mix a small drop of ivory colouring and a small drop of red colouring into a tennis-ball-sized piece of fondant icing.
When you place the large circle on top of the cupcake, use a ‘smoother’ like this rectangular piece of hard plastic to gently smooth and burnish using a circular motion. You can make your own smoother by cutting a rectangle of plastic from the packaging of toys, kitchen equipment, foodstuffs, etc.
Then you need some small blue circles for the base of the dummy.
Place the blue circle slightly more than halfway down the ‘face’, securing with a drop of water.
Make two small indentations above the blue circle for the eyes. I used the end of a small paintbrush.
Then roll two tiny balls of white fondant for eyeballs and press into the indentations, fixing with a tiny drop of water. Indent two smaller circles into the eyeballs and roll black fondant into balls and fix in place – these are the pupils.
Make an indentation on either side of the face, about 7mm from the edge of the cupcake, to indicate where the ears should go. Roll two pea-sized balls of flesh coloured fondant for the ears, fasten into place with a drop of water each, and use an indenting tool to hollow out one side of the ‘ear’.

Twist some small cones of yellow, brown, red or black fondant for the lock of hair, and fix to the top of the face with a drop of water. Then roll and cut a strip of pastel pink or blue fondant about 5mm wide and 10mm long. Place a dot of water in the centre of the strip and fold both edges in to the middle so they just touch. Wrap another strip of the same width but only 5mm long around the join and fasten it underneath. Push the ‘bow’ inwards from the sides to make it stand up a bit, and leave this assembly to dry for a few minutes. Then indent a hole in the top of the bow and fix a cachou in it with a drop of water. Place the finished bow just beneath the lock of hair, and fix with a drop of water.

Finally, fashion a dummy handle from a pink fondant ball. First roll a thick short cylinder, stand it on end and narrow out a ‘waist’. Then press the top (above the waist) between thumb and forefinger to flatten into a circular disc, and piece this with an indenting tool. Leave to harden for a few minutes and fix to the blue base with a drop of water.
A word on the cake recipes used:
Cooking gluten and dairy free cakes can be a bit tricky, because most flours contain gluten, and most cake recipes contain flour and often milk as well. I am not an expert on gluten but I understand that it is linked, or bound, to the starch component of grain flours (wheat, rye, barley, maize).
If you don’t often cook for food intolerances and allergies it is worth knowing that there are some traps for young players. Who would have thought for instance, that icing sugar could contain gluten? And yet, if you buy ‘soft icing mixture’ instead of pure icing sugar, you’ll see that it lists ‘wheat starch’ as an additive. THIS IS GLUTEN!!
Also, if you are a fondant icing user, have you rolled out your fondant with cornflour – and if so, have you checked that your cornflour is gluten-free? Some are, some aren’t – and remember that even if you buy a lovely gluten-free cornflour today to use for your gluten-free cookery, if you have used a gluten-containing cornflour to roll out fondant in the past and you are using fondant mixed or rolled previously, it will be contaminated with gluten. So be very careful because you don’t want to poison your friends :-)
The first recipe is a Dr Cupcake original. I adapted it from a standard gluten-free, rice flour cake. The texture of the rice flour is very fine and makes for a fine, crumbly and rather dry cupcake. This does not keep well – I recommend refrigerating or freezing if you are not eating them the same day (don’t refrigerate when they are fondant iced though because it will make the icing go tacky – you must just eat them straight away).
The second recipe is one that my mum gave me years ago, you can make this as a loaf cake as well – it does sink in the middle, but you can fill up the dip with fruit (if making a loaf cake) or chocolate (if cupcakes, see below). These have much better keeping qualities, they should be okay for about five days, longer if refrigerated. The marmalade is really good in this cake, even if you don’t usually like marmalade – it stops the cake from being too sweet but keeps it very moist, almost syrupy, and a bit tangy. Yum!
Red Cherry Cupcakes
*Gluten-free / *Dairy-free
Makes 10 cupcakes
2 eggs
1 cup castor sugar
1 ½ cups rice flour
1 ½ tsp gluten-free baking powder (check packet)
Pinch of salt
½ cup vegetable oil
½ cup cherry juice (from stewed, tinned or fresh cherries)
Red food colouring
50 g dark chocolate 70% cacao (check packet to ensure there are no milk products)

Preheat oven to 180C. Beat eggs and sugar together until thick and pale. Stir in the rice flour, baking powder and salt until combined, then add the vegetable oil and cherry juice. Adjust the colour by adding the food colouring until you have a dark pink mixture. Spoon into cupcake papers and bake. Check after 20 minutes – the cupcakes are ready when the top springs back lightly when touched.
Wait for the cupcakes to cool, then heat some water in a small saucepan. Place a clean dry heatproof bowl on top of the saucepan and chop or break the chocolate into small pieces, placing these in the bowl. Stir occasionally until the chocolate is melted. Using a teaspoon, drizzle chocolate over the top of each cupcake and spread evenly with a spatula. Finish with rolled fondant (if using rolled fondant, be careful to use a gluten-free cornflour or pure icing sugar with no wheat starch added to roll the fondant out).
Orange and almond cupcakes
*Gluten-free / *Dairy-free
Makes 12 cupcakes
3 eggs
100g ground almonds
50g castor sugar
1 tsp gluten-free baking powder (check packet)
175g orange marmalade
100g dark chocolate 70% cacao (check packet to ensure there are no milk products)
Preheat oven to 180C. Beat the eggs with an electric beater so that they are very thick, creamy and form a ‘ribbon’ – this will take between 5 and 10 mins at full speed. Mix the dry ingredients together and fold them carefully into the egg mixture, being as careful as possible not to lose the air from the eggs. Then add the marmalade and fold in. As soon as the mixture is evenly combined, spoon into cupcake cases and bake for about 20 minutes. Check cakes with a skewer – if it comes out clean, the cakes are ready. These cakes will rise, then fall in the middle quite deeply – this is normal.
When cakes are cool, heat some water in a small saucepan. Place a clean dry heatproof bowl on top of the saucepan and chop or break the chocolate into small pieces, placing these in the bowl. Stir occasionally until the chocolate is melted. Using a teaspoon, drizzle chocolate into the centre of each cupcake, filling the dip entirely so that the top of the cupcake is a level ‘lake’ of chocolate. Leave in fridge to harden.
Finish with rolled fondant (if using rolled fondant, be careful to use a gluten-free cornflour or pure icing sugar with no wheat starch added to roll the fondant out).
Enjoy!