Showing posts with label fondant decorating. Show all posts

Monday 31 October 2011

Horse race cake for Melbourne Cup (cake) Day

Melbourne Cup Day is the first Tuesday in November, the greatest event on the racing calendar all year. Others may have the Grand National and Ascot, but for an Australian there is nothing better than the race at which legends are made. 
So the least I could do was to celebrate the event with a horse race cake. 


In Australia, it's 'the race that stops the nation' - so of course the other side of the flag had to read...


As Flemington race course has a grass racing surface (Mr Cupcake helpfully informed me of that, I assumed they raced on a sandy track) I made a little grassy ring on top of a sandy track-type surface. 

If I'd had an oval tin, I would have used that, but mehhh.... circles are good for racing too aren't they?


This was the very simple start to the horse race cake. A chocolate mud cake, adapted to be gluten free (regular readers of this blog will begin to notice a pattern here) - I swear, it makes not a jot of difference to the taste. 

I had two cake tins exactly the same size and 'nested' them to bake this, so that there would be an extra layer of insulation - the tins were quite thin so this effectively doubles the thickness of the tin and ensures a more consistent heat spread and a better result. 


I drizzled the cake with a diluted, strained apricot jam to keep it moist, then ganached the cooled cake and hot-knifed the ganache for a smooth surface (detailed instructions here).

Then I rolled out a piece of sandy-coloured fondant big enough to cover the top and sides in one piece, and draped it over, attaching it to the cake with a light painting of water. 


I smoothed the fondant from the centre outwards, using first my hands, then a cake smoother (amazing plastic contraption that looks a bit like a skinny little iron). I trimmed around the base really carefully - this is actually really hard to do, and usually I have to cover my terrible mess with a ribbon on the base. But I was really OCD about it this time, and it paid off. 


So then it was time to work on the horses. 

I'd seen a blurry front-on pic of a horse figure that some brilliant person had posted on Facebook's Cake Decorating Society page. That started me on my modelling but there was a lot of experimentation involved. 

Here you see the horse body (the big bit), and the four little legs, with toothpicks sticking out for support when the figure is put together. 


Same deal, different colour - once I had a pattern I tried to be consistent in size and shape, and kept a finished horse beside me all the time to use as a model. 


This disembodied horse's head may freak out anyone who's seen The Godfather, but I promise you it's perfectly innocent. His little head had to be made separately before being attached because of the detail on the face. 

Ears were two layers of teardrop shaped fondant in contrasting colours; his blaze (do you call it that? - Yasmin, my most knowledgeable horse friend where are you when I need you) - anyway, his STRIPE down his nose, and his muzzle, were rolled fondant cut into a strip and pressed by hand into an oval, respectively. 
The two nostrils were made with tweezers - I keep a pair exclusively to use for cake decorating. 


I was worried about whether his little legs would collapse under the weight of his big fat tummy, but fortunately he held together very well, the little darling. He looks a bit scared. Big race coming up. 


He looked even more worried when I added his mane and tail. 


So I gave him some friends as quickly as possible, to calm his nerves and get some track work underway.

Cornflour helps their little hooves from sticking to the track. 


This is a rather undignified shot of a cheeky little mare with a white mane and tail. 


Her hairy bits were created from little strips shown here - the top one is the mane, and the lower is the tail, which gets rolled up a bit at one end and attaches to a little hole in her backside with a drop of water. 


Track work now commenced in earnest with four gallopers trying to lose their paunches before the big race. 
The one at the back still looks absolutely terrified, poor darling. 


...And so it was finally time to get them onto the course. As Mr Cupcake pointed out, their jockeys have not yet mounted, so this is possibly a training run. 


Place your bets, ladies and gentlemen... have a wonderful Melbourne Cup Day and think of me and my colleagues in the office, taking a break for the few minutes of the race and accompanying it with a little bit of horse race cake!


Halloween cupcakes with sugar skulls

Ever since last Halloween, when I used PLASTIC skull favours to decorate cupcakes (here) and felt dirty for doing it, I have been thinking of how to make edible skulls for these rich but sinister little cupcakes.


The interior of the cupcake is a chocolate mud cake rich in shortening, sugar and chocolate and light on flour. I used gluten free flour too, because increasingly people are experiencing gluten intolerance and this makes cakes more accessible for many of my friends.


 The sugar skulls were cast from plasticine moulds using a convenient blingy skull necklace that I had to hand. Neither the casting medium nor the object from which the cast was taken were ideal, but after a full month searching for a plastic skull of the right size (like the ones I THREW AWAY last year) and some high quality DAS hard-drying modelling material (like my Dad sold for 20 years on end in his toyshop) I gave up on both and used the only things I had to hand. Considering the materials I had to work with, I was really pleased with the result.


So I pressed my little skull necklace into some kids' plasticine that promised to be 'air-drying'. 
My first task after that was to dig through the toolbox for the superglue and retrieve and glue back the diamante decorations that had been pulled out of my little skull by the plasticine (I told you it was blingy). 
The plasticine was not as air-drying as I would have liked but it was adequate. The sugar mix recipe is here


After pressing the sugar into the mould, I immediately unmoulded it, repeating the process about 20 times and dusting the mould with cornflour each time to prevent sticking. 
The unmoulding process was not without its dramas. The mould had to be tapped firmly onto a waiting piece of cardboard, then gently trimmed at the edges to clean up unwanted grains.


...As I said, the unmoulding process was not without its problems. 


But within an hour I had a set of sweet little sugar skulls resting on a baking tray. The differences were interesting - I made two moulds, so you'd expect two sets of identical skulls, but there was a bit of variation in how well the sugar stuck to the molds, and how I trimmed the unmoulded pieces. 

I left them to dry in a warm place for 24 hours to firm up. 


Next for the actual cupcakes. I had planned to make full size cupcakes, but the skulls were small in comparison to that surface area so I elected to make mini cupcakes, thinking that the decoration would be more proportionate. 

As noted above I used a rich chocolate mud mixture, but you could use any type of cake. 


I've talked before about the importance of good baking tins, with some thickness. I had two mini cupcake baking trays of exactly the same size, so I nested them one inside the other, using only the top one for the cupcakes. This provides an extra insulation layer for small cakes that can otherwise burn easily. 

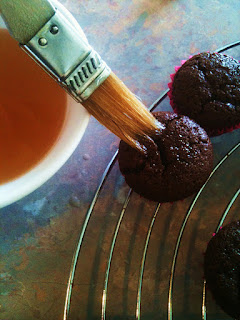
After baking, I brushed them with a watered-down and strained apricot jam syrup, to retain the moisture inside them - not necessary, but it makes them last longer. 


Then, to get a smooth-as-silk surface for my fondant decoration, I ganached the tops of the cupcakes, pressing ganache into all the small bumps and cracks to end up with a perfectly smooth surface. This lets you use a very thin layer of fondant while still achieving a smooth surface. 


Next came the fondant covering. I used black fondant, coloured with black gel colouring (tip: wear latex gloves when mixing it up). Then I rolled it out thin and cut circles with a cutter a little bigger than the surface of the cupcake. 


Attaching the fondant circle to the top of the cupcake with a few drops of water, I burnished it with some clear acrylic like in this picture. This smoothes the top perfectly and gently pushes the edges of the fondant down to meet the edge of the paper liner. 


This is the production line showing the next three stages. 

On the bottom right is a fondant-covered cupcake. Next it is sprayed with a clear food lacquer (amazing product and worth the money); then a small dot of royal icing is piped or dotted in the middle of the glossed cupcake, to act as adhesive for the skull. Finally the skull is gently placed in the centre. 


The scale of the mini cupcake was effective for the size of the skull. 


I had a few more cupcakes than skulls, so to finish off, I made some Halloween toadstool rings with some little sugar toadstools that I've had for some time (not home made). 


My Eureka moments in making Halloween Skull Cupcakes: 
  • Diamantes are easy to lose if they fall into the carpet. 
  • If you're cooking gluten-free, make sure you grease and flour cake tins, and flour moulds, with gluten free flour as well. Don't make your friends hate you. 
  • Be careful with fan forced ovens because they always cook a bit quicker than you're prepared for. 
  • If you drop a full glass bottle of blackberry cordial on a tile floor in the middle of baking, allow an extra hour for clean up. 
  • Try to be extra careful not to get cornflour (for rolling our your fondant) onto the top surface of black fondant because it is very difficult to remove. 
Happy Halloween everybody!!!


Sunday 17 July 2011

Other cupcake designs... Native animals and simple flowers

What do you serve when members of the Greens political party are coming to the office for afternoon tea? Well it's simple - cupcakes with bright green icing and some sort of natural environment theme ... Like these possum cupcakes.


 The possum pattern bears more than a passing resemblance to an old Wilderness Society sticker design that read 'Wilderness not woodchips' and had a bright red possum next to the slogan. I always loved the way that the sticker was the shape of the possum's back and tail which formed a perfect circular curve. Those stickers have long disappeared and I could only find a tiny image of one on the webs - I based this possum design on that graphic.


To begin your possum cupcake, cover your ganached cupcake (see earlier posts) with a good bright green coloured fondant. Roll the fondant out and cut it with a large circle cutter - choose a cutter size a bit bigger than the cupcake. Stick it in place with a few drops of water and burnish to make it smooth.


Then roll out some brown fondant and, with a circle cutter a few sizes smaller, cut a circle, a small heart and a tiny diamond. The circle will be the body, the heart will be the head and the diamond will make the ears of the possum.
Starting on the circle, use a cutter another size down to cut a semicircle about 3mm from the edge - this will be the tail - and, at the point this semicircular line finishes on the left side, cut two semi circles as shown to provide the outline of the legs and feet. Discard the rest of the infill area fondant. Trim the fondant in a diagonal line up past the 'front leg'.
Then, using the small heart cutter, cut a heart and hand shape it into a triangle shape, sitcking it on the body point down to make the head.
Cut the tiny diamond out of fondant, then cut this in half and hand shape each half to make a little ear. Stick these on with a drop of water.
Make the eyes - roll two small balls of white fondant, and two smaller balls of black fondant for the pupils. Stick the 'eyeballs' onto the face, about halfway down, with a drop of water (it helps if you make a small dent for each eye and nest the eyeball into the dent). Then make a tiny indentation into the white eyeball and drop the black 'pupil' into it, fixing with a very tiny drop of water.


I experimented and found that these possums are more effective with no nose or mouth. After all the big thing about possums is their huge staring eyes. I think it looks almost more effective if the eyes are slightly uneven. Your possums will look suitably alarmed and slightly mad.


For a bit of variety it's good to throw in some flower cupcakes - this continues the natural theme but brightens up the colour scheme a bit. 

These are the simplest of fondant-iced cupcakes to decorate. You need some circles slightly bigger than the cupcake top, and then some cut out shapes of flowers, hearts or anything else in varying sizes.


These are quick to decorate and can help you to use up colours that you have previously mixed but can't find a use for.

I made these with a pink base and mixed green, blue and yellow flowers.


Enjoy nature and cupcakes together with these environmentally friendly designs!

Saturday 16 April 2011

Hatching chicken cupcakes for Easter

Little chicks bursting out of white 'egg' cupcakes... Yes, Easter is here and Dr Cupcake is celebrating!
These little chicks have a cheeky look to them and they're full of character, but surprisingly simple to make, Sitting on top of a chocolate mud cupcake, they make for a festive Easter.


Thanks to Sally Alps of Alps & Amici for this lovely design.


To start, ganache your cupcake so that you have a flat smooth surface (see previous posts). Then roll and cut a small white fondant circle and stick it in the middle of your cupcake, using a drop of water to fix it in place. It doesn't matter if the edges aren't perfect, because these will be covered. Coat the top of the circle with cornflour - you can see a thick sprinkle of cornflour in this pic.


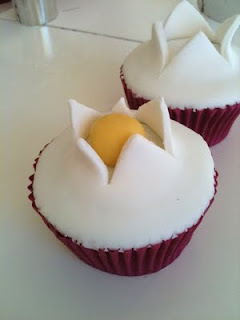
Then cut a larger circle out of white fondant and lay it on top of the cupcake, pressing down gently around the double-thickness circle in the middle, and burnishing the edges carefully with a piece of hard plastic (see previous posts). You will end up with a white fondant-topped cupcake which looks smooth but has a raised circular shape in the centre due to the double thickness of the fondant.


Now take a small sharp knife and make a straight cut through the double thickness circle in the middle.


Then make another cut at right angles to it, so that you have cut a cross.


Using the edge of the knife blade, gently prise the corners of the top layer of fondant up and fold them back a little so that they stick up into the air. This is your 'cracked eggshell'.


If the white base underneath is cut or marked don't panic because the chicken will be sitting on that bit so you won't see it.


Next roll a ball of yellow fondant and cut one side of it off with a sharp knife so that you have a flat surface at the base. Stick this into the 'egg' with a drop of water. This is the chicken's body.


Roll a smaller ball of yellow fondant for the chicken's head and stick it to the body with a drop of water. Be careful not to use too much water or you'll end up with a very sticky chicken.


Get a tiny piece of orange fondant and roll a little cone shape between your thumb and forefinger. Cut the cone off at its base with a small knife - it should be about 2mm long.

Then take a slightly larger piece of orange fondant and make a comb for the chicken's head. This starts off as a flattish sort of oblong shape. Stand the oblong up horizontally, so that one of its sides flattens out to form a base. Then use a small pair of scissors (sterilised nail scissors or barber's scissors are good) to snip into the other side of the oblong, like in this pic. When finished, carefully position the comb on the chicken's head and fix with a very tiny drop of water.


Paint two tiny black dots for eyes, using black food colouring or an edible food pen in Jet Black (available from cake decorating stores).
In this pic, I have done the eyes of the front chicken but he has not yet got his comb on. The chickens at the back have obviously been distracted by something happening off camera to the left.


Hey presto Easter chickens hatching out of pure white eggs!

A small tip, it helps if your cupcakes are quite domed on top - mostly I aim for flat topped cupcakes, but these seem more 'eggy' if they are rounded.

You could have all sorts of creatures hatching from these eggs (if it wasn't Easter of course). I've seen some awesome Paris Cutler designs of baby dinosaurs hatching.


 As we know, it's not all about fondant. Sometimes there's room for old fashioned glace icing (especially when you're doing gluten free orange and almond cakes that sink in the middle and don't give you a flat surface).

These little cakes are iced with a lemon glace icing (lemon juice and icing sugar stirred to a stiff paste) with a little yellow colouring added.


The icing was piped on using a star nozzle to get a slightly 'nestlike' shape, and the eggs pressed into the icing while it was still soft.

I used some pretty little milk chocolate eggs that were a quick purchase from the supermarket. I loved the speckles and the soft eggshell like colours.

Happy Easter, may the Easter Bunny be generous and not lead you on too exhausting an Easter Egg Hunt. :-)