Tuesday, 20 September 2011

Katie's spring garden birthday cake

My beautiful co-worker, Kate, had a birthday recently, and we all love birthdays because it gives the whole office an excuse to take a minute out of our busy day to celebrate together. We've been enjoying some great weather lately, the birds are singing, the flowers are blooming and it just seemed a good idea to make a spring garden cake. 


I admit that this cake was produced in a bit of a hurry, since Katie had the bad timing to have her birthday on a Thursday (the best birthday day is clearly a Monday because you have the whole weekend to play at cake decorating). Also, Criminal Minds is on telly on Wednesday evenings. Kate was lucky not to end up with a 'murder scene' cake. 


Rome wasn't built in a day, but this cake was. Inside, it's an orange cake made with ground almonds and marmalade. As soon as it was out of the oven and cooled down, I spread it with ganache all over the top and sides to smooth any dips or uneven bits. 


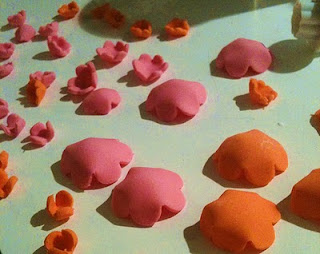
While leaving the ganache to firm up, I made some flowers from orange and pink coloured fondant, rolled thin and stamped out with some different sized flower cutters. I used a ball tool to curve the flowers up and left them to harden. 


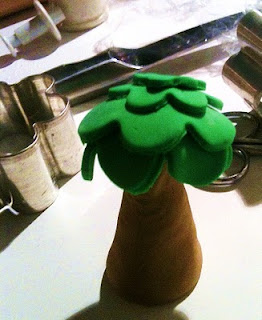
Next I wanted some trees. These are halfway between a palm tree and something out of Dr Suess... not deliberately, just because I am not very good at trees. 


I started with making different sized flower shapes out of rolled green fondant, for the canopy. 


Then I made a cone of brown fondant and supported it by pushing a lollipop stick down the centre of it. I fixed a ball of green fondant on the pointy end and draped the layers of green canopy over the top, and left this to dry. 


After I had made two trees and quite a few flowers (more than I needed - you can store these in an airtight container almost indefinitely), I wanted some clumps of long grass.


To make a clump of grass, take a small amount of green fondant and hand roll it into a little cone. Then, using a small pair of scissors, snip into the cone vertically to end up with six or eight points of 'grass'. 


By this time the cake and its ganache coating was set and hard. I rolled out some light green fondant, large enough to cover the entire top and sides of the cake, and smoothed it on. 


At this stage the trees, grasses and flowers just needed to be placed on their little lawn. 


All the bits'n'pieces were fixed to the cake with a few drops of water. 


I stuck some coloured cachous in the centres of the flowers for extra bling. 


All that was left was to get the birthday girl to cut the cake! This is Kate holding the knife (and her security pass, bizarrely - maybe if you wave your pass and flash that beautiful smile Katie, the security guys won't mind that you have a large knife handy??)


The big moment... cutting the cake whilst a Minister of the Crown lurks in the background :-)


Within a few minutes we had done some serious pruning of the spring garden. 


Happy birthday Katie!


Sunday, 11 September 2011

Strawberry cake pops a go go

There's nothing like seeing a ripe, juicy strawberry in the garden on a warm Spring day... especially if the strawberry in question is actually a cake pop.

Oh yes. Cake pops invaded the garden today, but only for a photo opportunity (such showoffs).

They then had a trip across town to Hobart's premier microbrewery, but that's another story.


I saw these in the same Cake Pops book that got me making spring chickie cake pops - see previous post - and because I had some leftover mixture ready to go and also happened to have some bright red candy melts, I had to give them a try.
So today I had the mixture already rolled into balls and frozen. I defrosted them and re-shaped them into strawberry shapes (a sort of wide cone). Then I put them back into the freezer for 15 minutes or so, to firm up again.

This is a particularly ugly picture of my hand.


Next I wanted to make a leafy top for the strawberry. The book recommended you do this by piping liquified green candy melt into little flower shapes and letting them dry out, but I thought it would be a lot easier to make them from rolled fondant, tinted green. This is the fondant being tinted.


After the fondant was tinted I rolled it out and used a flower shaped cutter to make a few little leaf shapes.


Then it was time to get dipping. I melted the candy melts according to packet instructions and when I had a nice smooth melted mixture in the bowl, I balanced it precariously inside another bowl full of very hot water. This failsafe system adds maximum risk to the operation, because if you get a single drop of water into your melted mixture, it will seize up and be unusable.

I dipped the stick in the mixture first, then stuck it halfway through the cake ball and dipped the whole thing carefully back in the mixture...


...Carefully smoothing the mixture right up to the edges of the stick with a spatula.


Then I removed it from the mixture and started to tap it gently on the side of the bowl. This allows the extra mixture to fall off in thin streams and gives a smoother surface finish. A few rotations of the stick helps to make it smooth all the way round.


Then I sprinkled some dark chocolate cachous on the surface of the pop to look like the seeds of the strawberry....


... And stuck them into a bit of styrofoam to dry. They only took about 10 minutes, and were quite easy to handle after that.


I couldn't resist taking them out into the garden for a natural setting...


... But their final destination was never really in doubt.


FAQs
What I learned from my cake pop experience:

1. When tapping cake pops on the bowl to get the extra mixture off, you will get splatters of bright red mixture all over your clothes, hair, bench tops and floor.
2. The red mixture has approximately the same sticking and hardening qualities as superglue.
3. Dark chocolate cachous look a lot like peppercorns.
4. Don't buy mixed dark and white chocolate cachous unless you want to spend half a day sorting them individually, with tweezers.
5. Matching your popstick colour to your candy melt colour means not having to apologise for messiness.
6. When using styrofoam to let the pops dry, a precarious balance situation is created which can have dramatic consequences.

Monday, 5 September 2011

How to make cake pops! ..... (that look like chickens)

So on a rare and wonderful day off, I made my first ever cake pops in the shape of little chicks: 
I was inspired to make them by a wonderful book called (surprise surprise) Cake Pops, by Angie Dudley, a.k.a Bakerella. 
At the moment I own this on Kindle, which is not very practical, because Mr Cupcake gets annoyed when his iPad gets cake, icing and food colouring all over it. 


These little chicks have a hard coating, with a moist and delicious mixture of chocolate mud cake and coffee cream cheese icing inside. 


As you can see in the pic above, you need to stand the cake pops up in some sort of stand, both while they are drying, and also to display them. Therefore my preparation started with power tools because I needed to make a customised stand. 
This process involved turning the garage upside down trying to find a spare piece of wood, then trying to match a lollipop stick to my much depleted box of drill bits. There was much cursing as I wondered where do all those missing drill bits GO?


I found an elegant wood block that had originally been part of a timber vase and was missing its glass inner piece. I thought this would make a nice stand. You can see the lollipop stick and the corresponding drill bit. 
Miraculously the drill battery was charged - well, half-charged - so I proceeded to drill some holes to make my stand. 


Because my drill was half charged, the drill bit was quite shit and the timber was very hard, the drill holes ended up quite shallow. They worked ok but I'll deepen them at some stage so that the pops will stand up more securely. 


So with the hardware put away, it was time to tackle the pops!

Firstly you need a cake - I had some odd shaped pieces of chocolate mud cake in the freezer that were left over from a previous cake decorating session (actually, from making my sushi cupcakes the I described in a previous post). So I used these leftover pieces because the size and shape didn't matter - it all had to be crumbled. 
I crumbled the cake with my fingers, making sure that there were no large pieces left. You could do this in a food processor if you wanted. 


Then you have to mix some icing into the cake crumbs, so that you get a firm, dense and moist mixture that can be shaped into balls. You could use any type of icing - I made a simple cream cheese icing (one part spreadable cream cheese to three parts icing sugar) and flavoured it with some cafe trablit, which is a strong coffee syrup, 
This is the icing being stirred into the cake. Put in about a tablespoon at a time and stir it thoroughly each time, until you get a texture that starts to ball away cleanly from the sides of the bowl. 


Once you have a texture that is firm and truffle-y, but not sloppy, you can start rolling cake balls. Lay some baking paper on a tray, and make sure your hands are clean and completely dry. 
Scoop the mixture by spoonfuls into the palm of your hand. You need about a large teaspoon, but it's up to you what size the cake balls should be. Roll them gently in your palms until they are spherical, then place them on the baking sheet. 


I included this pic so you can see the texture. They do not have to be super smooth, but they need to hold together well without crumbs going everywhere. 
You may have to wash and dry your hands every so often because the rolling process gets harder the stickier your hands are. 
When you're done, put the tray of cake balls in the freezer for 15 minutes (or leave in the fridge for a couple of hours) and get your decorating things ready. 


For the little chicks, they need little feet and beaks made of orange. In her book, Bakerella uses a variety of ready made lollies, cachous and candies for this purpose but I didn't have any, so I rolled some orange decorating fondant and stamped some tiny stars...


....and hand-rolled some tiny fondant cones for the chicks' beaks.


To make the coating for the chicks, you need some yellow candy melts. These are available in cake decorating stores and come in a variety of colours. The name is a little deceptive - they are not really 'candy', as in lollies or sweets, they are more like white chocolate, and are made of vegetable oils, milk solids and sugar. 
A possible upmarket alternative would be to get white chocolate couverture pastilles and tint them yellow with chocolate tint (but note this is not the same as gel food colouring that you use for tinting fondant). 

Melt the candy melts according to the packet instructions - you can microwave them, or use a double boiler. 
When the candy is melted and smooth, turn it into a deep, narrow bowl so that you have a depth of at least 10cm. Sit this bowl in a larger bowl filled with hot water so that the mixture stays melted for longer.
Take the cake balls out of the freezer. They should be cold and firm but not frozen.
Take a lollipop stick and dip it into the melted candy to a depth of about a centimetre. Then stick it into a cake ball, just until it's about halfway through the ball. 


 Then carefully dip the cake ball into the melted mixture until it is completely submerged. Don't stir it around while it's in there - you don't want crumbs coming off and messing up your dipping mix. 


Gently lift the pop out, then tap the stick on the side of the bowl, 7 or 8 times, to allow extra candy to flow off. This will form a little ribbon coming down off the pop into the bowl. Every now and then, rotate the ball a little so that the coating stays relatively even. 
When you have a nice even coat, place the pop in your ready made stand to dry hard. 
Repeat with all other cake balls. 


When the coating has dried, stick the 'beak' on with a little extra candy coating (wow, I made a messy job of that one - oops)


Then stick two little stars on to the bottom of the pop - these are the chick's feet. 


Use some black food colouring and a pair of tweezers, cleaned and sterilised, to dot two little eyes on the chick. 
This is a terrible pic but it gives you the general idea. You can dot both eyes at once, equidistant from the beak. 


And hey presto - there is your little chick cake pop! 


If you want to give your cake pops away, you can customise a box to store them. 
To make this, I used a spare gloss cardboard box that had been used to hold a desktop calendar.  
I got out my trusty drill (rapidly losing power at this stage) and put holes through the sides at regular intervals. 
The sticks of the pops can then be inserted through the holes to keep the pops in place. 
The pops are actually quite tough but beware of knocking the beak or the feet as they can break off. 


I'm happy to report that the little chick cake pops tasted good too. They were moist and full of chocolatey goodness. Their little hard coats were satisfyingly crisp and they held together well on their sticks. 

Here's to lots more experiments with cake pops!


Monday, 22 August 2011

Whoopie pies.... with a black forest theme

I had never heard of whoopie pies before this year. They are a traditional American sweet, a cross between a soft cookie and a cake, and originated with the Amish, who made them to use up little bits of leftover cake batter.


Amish farmers apparently used to find them in their lunchboxes occasionally and got so excited they would shout 'Whoopie!" You have to love that degree of excitement over baked goods.

Mr Cupcake asked the interwebs about them and then informed me that whoopie pies are the 'State Treat' of Maine, USA - not to be confused with the official Maine State Dessert which is apparently blueberry pie. I love that someone in Maine wanted to give State status to both a dessert AND a treat.

These whoopie pies are a red velvet mixture with a mascarpone and cream cheese filling flavoured with cassis liqueur and studded with cherries soaked in cassis, and a dark chocolate topping. They are very rich and decadent (those guys in Maine must be on the chubby side).
Disaster 1 - the baking tray batch
My first attempt to make whoopie pies, the day before these, was a complete disaster.

I read that I could cook them by piping circles of cake batter onto baking trays, or using whoopie pie tins, which are like cupcake tins, but the holes are larger and much flatter (cookie shaped rather than cake shaped). As I didn't have any whoopie pie tins I decided to make two batches, the first piping circles onto flat trays, the second using a cupcake tin but only filling the holes a quarter full - I reasoned I would get small whoopie pies that way, and larger ones on the tray.


Disaster 2: the cupcake tin batch

Except. Except I didn't. I got a tray full of completely joined-up batter about a centimetre thick (which I tried to turn into a swiss roll, but even that didn't work) and about 8 full size cupcakes - they rose and rose, the little buggers.


But the good thing about whoopie pies that look like cupcakes is that you can pretend you set out to make cupcakes.... so these were my first 'whoopie pies' ... vanilla cupcakes.... :-)


So-called 'muffin top' tins
So on my second attempt I zoomed out to Woolworths in Newtown - a truly excellent facility - and bought a couple of five-buck 'Muffin Top' tins. After having a giggle at the name I decided that these tins were actually whoopie pie tins and were essential for the job.


The actual recipe for my second batch was a red velvet whoopie pie recipe from a new English book called Whoopie Pies, by Hannah Miles (the first, failed batch was a vanilla recipe from the same book). It produced a very nice, light cake with a fine crumb, which turned out of the tins beautifully, without cracking or flaking. It was almost like a butter cake recipe but with a hefty amount of buttermilk and some water added, which I guess helped with the lightness.


With the right equipment, my second batch worked much better. This time I got cookie-shaped rounds of cake, with a fine texture and a good shape, if a little thin (my high-rise cupcake experience of the day before had made me scared to fill the tins up).


They turned out of the tins really well and I was able to fill them and top them with chocolate.


Going from the general look and feel of the fillings in the book, I made up my own 'black forest' filling. This consisted of halved cherries macerated in Cassis liqueur (I would have used Kirsch but I didn't have any)...


...Mixed with a creamy filling which was roughly equal portions of mascarpone, spreadable cream cheese, icing sugar and a splash of cassis. I put this in a disposable piping bag and piped it out onto half of the whoopie pies, studding it with a few cherries, and then sandwiched it with another whoopie pie on top.


I tried some different piping patterns (both with a star nozzle). That's why one of the whoopie pies in this picture looks a bit messy.


To decorate the top (because it seems like whoopie pies are often iced as well as filled) I melted some dark chocolate with my trusty home made double boiler arrangement - a china bowl precariously balanced on a tiny saucepan full of boiling water.


Then I spooned it on the top of the whoopie pies and finished with a cherry half on top.

Now, I was pretty happy with the way this picture turned out - they look so luscious and glossy and all - but I have a confession to make. These were a bit TOO RICH for Dr Cupcake! Yes indeed. There was an awful lot of filling in proportion to the cakey part, and the filling was pure dairy goodness - so much of it that I felt like I was becoming more lactose intolerant with every mouthful. I think next time a whipped cream filling, moderate in quantity, could work as it would be a lot lighter.


Recipe for cake batter:
125g unsalted butter or margarine (apparently they are traditionally made with vegetable shortening)
200g caster sugar
1 large egg
1 tsp vanilla extract
300g self raising flour
20g cocoa powder
1 tsp baking powder
1/2 tsp salt
250ml buttermilk (or plain yoghurt)
2 tsp red food colouring
100ml hot (not boiling) water

Set oven to 180C (350F) and grease and flour the tins. Cream the butter and sugar together until light and well combined. Add the eggs and vanilla extract and beat again. Sift all the dry ingredients in and mix again, then add the buttermilk, colouring and the hot water. You should end up with a sloppy but not liquid mixture which can be spooned (messily) into the pans. Let the mixture sit in the pans for 10 minutes, then pop into the over for 10-12 minutes. When you take them from the oven, run a metal spatula carefully around the edges to release the pies and cool them on a rack before filling and icing them.
Keep in a sealed container in the fridge - these are best eaten the same day but can keep for several days, depending on the filling.