Monday 31 October 2011

Halloween cupcakes with sugar skulls

Ever since last Halloween, when I used PLASTIC skull favours to decorate cupcakes (here) and felt dirty for doing it, I have been thinking of how to make edible skulls for these rich but sinister little cupcakes.


The interior of the cupcake is a chocolate mud cake rich in shortening, sugar and chocolate and light on flour. I used gluten free flour too, because increasingly people are experiencing gluten intolerance and this makes cakes more accessible for many of my friends.


 The sugar skulls were cast from plasticine moulds using a convenient blingy skull necklace that I had to hand. Neither the casting medium nor the object from which the cast was taken were ideal, but after a full month searching for a plastic skull of the right size (like the ones I THREW AWAY last year) and some high quality DAS hard-drying modelling material (like my Dad sold for 20 years on end in his toyshop) I gave up on both and used the only things I had to hand. Considering the materials I had to work with, I was really pleased with the result.


So I pressed my little skull necklace into some kids' plasticine that promised to be 'air-drying'. 
My first task after that was to dig through the toolbox for the superglue and retrieve and glue back the diamante decorations that had been pulled out of my little skull by the plasticine (I told you it was blingy). 
The plasticine was not as air-drying as I would have liked but it was adequate. The sugar mix recipe is here


After pressing the sugar into the mould, I immediately unmoulded it, repeating the process about 20 times and dusting the mould with cornflour each time to prevent sticking. 
The unmoulding process was not without its dramas. The mould had to be tapped firmly onto a waiting piece of cardboard, then gently trimmed at the edges to clean up unwanted grains.


...As I said, the unmoulding process was not without its problems. 


But within an hour I had a set of sweet little sugar skulls resting on a baking tray. The differences were interesting - I made two moulds, so you'd expect two sets of identical skulls, but there was a bit of variation in how well the sugar stuck to the molds, and how I trimmed the unmoulded pieces. 

I left them to dry in a warm place for 24 hours to firm up. 


Next for the actual cupcakes. I had planned to make full size cupcakes, but the skulls were small in comparison to that surface area so I elected to make mini cupcakes, thinking that the decoration would be more proportionate. 

As noted above I used a rich chocolate mud mixture, but you could use any type of cake. 


I've talked before about the importance of good baking tins, with some thickness. I had two mini cupcake baking trays of exactly the same size, so I nested them one inside the other, using only the top one for the cupcakes. This provides an extra insulation layer for small cakes that can otherwise burn easily. 

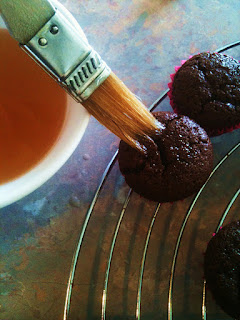
After baking, I brushed them with a watered-down and strained apricot jam syrup, to retain the moisture inside them - not necessary, but it makes them last longer. 


Then, to get a smooth-as-silk surface for my fondant decoration, I ganached the tops of the cupcakes, pressing ganache into all the small bumps and cracks to end up with a perfectly smooth surface. This lets you use a very thin layer of fondant while still achieving a smooth surface. 


Next came the fondant covering. I used black fondant, coloured with black gel colouring (tip: wear latex gloves when mixing it up). Then I rolled it out thin and cut circles with a cutter a little bigger than the surface of the cupcake. 


Attaching the fondant circle to the top of the cupcake with a few drops of water, I burnished it with some clear acrylic like in this picture. This smoothes the top perfectly and gently pushes the edges of the fondant down to meet the edge of the paper liner. 


This is the production line showing the next three stages. 

On the bottom right is a fondant-covered cupcake. Next it is sprayed with a clear food lacquer (amazing product and worth the money); then a small dot of royal icing is piped or dotted in the middle of the glossed cupcake, to act as adhesive for the skull. Finally the skull is gently placed in the centre. 


The scale of the mini cupcake was effective for the size of the skull. 


I had a few more cupcakes than skulls, so to finish off, I made some Halloween toadstool rings with some little sugar toadstools that I've had for some time (not home made). 


My Eureka moments in making Halloween Skull Cupcakes: 
  • Diamantes are easy to lose if they fall into the carpet. 
  • If you're cooking gluten-free, make sure you grease and flour cake tins, and flour moulds, with gluten free flour as well. Don't make your friends hate you. 
  • Be careful with fan forced ovens because they always cook a bit quicker than you're prepared for. 
  • If you drop a full glass bottle of blackberry cordial on a tile floor in the middle of baking, allow an extra hour for clean up. 
  • Try to be extra careful not to get cornflour (for rolling our your fondant) onto the top surface of black fondant because it is very difficult to remove. 
Happy Halloween everybody!!!


Monday 24 October 2011

Is it icecream? Is it cake? ...No - IT'S A CAKEPOP!

There's something childlike and charming about making things that look like other things. Ask Heston Blumenthal, who specialises in it. Not that I'm comparing myself to the Great Man - but I did have a lot of fun making these icecreams (which aren't).

The cones are real mini cones, but the icecream is actually a thick layer of pink-tinted chocolate with a lush interior of crumbed orange and almond cake mixed with lemon cream cheese icing.

Huge thanks to Angie Dudley, a.k.a. Bakerella whose awesome book Cake Pops this idea came from.


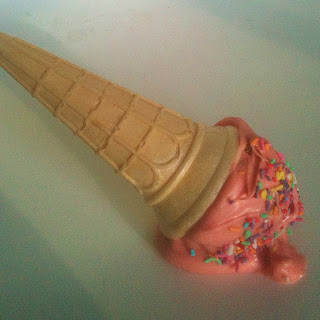
No childhood fantasy would be complete without its dark side, the ultimate childhood disappointment of a dropped icecream.
I remember the devastation of dropping an icecream on the pavement when I was about four, just as I had walked out of the milkbar. It was the worst moment in my life that far. So making these 'permanently dropped' icecreams was quite cathartic for me.


So these are the start of the icecreams - surprising as that is.
The balls are made from an orange and almond cake (for recipe see here) , crumbed and mixed with a little lemon cream cheese icing.
I must admit I had a bit of trouble crumbling the cake mixture because it was too moist, so it sort of squished rather than crumbled. I guess I shouldn't have added icing to it then, because I knew that would make it even moister, but you know, I did. And ended up with, well, sludge. Nice tasting sludge.

Needless to say, it was a hard job rolling it into balls. A fridge was involved for several hours before rolling, and a freezer was required for several hours thereafter.

Next job was the pink coating. This marvellous substance is Wilton's Candy Melts, a mixture similar in taste to white chocolate but tinted in different colours. It comes in packages from cake decorating stores (in Hobart, try Habitat or Spotlight for a start). For this project I got pastel pink and some dark chocolate melts which were mint flavoured.

They melt well in the microwave if heated gently, on 50% heat, in small bursts of a minute or so.


When the pink melts are smoothly melted, stick a dipping fork, knife, or skewer into a cake ball and lift it gently into the melted mix.


You need to push it right into the mixture and use a knife or spatula to push the mixture right up the sides to cover the whole ball.


Then gently tap the fork on the side of the ball to make any excess mixture drip off and get a smooth texture.


As soon as the ball is dipped, drop it into a waiting cone. If there is any cake ball visible where you've pulled out the fork, use a little more melted mixture to patch the hole. The mixture will dry quickly and stick the ball to the cone.

I also sprinkled a few sprinkles around the edges of the pink topping at this stage, avoiding the centre because that will be covered up later.


So after a few dips and sprinkles you'll end up with some quite realistic little cones.

Usually with cake pops the aim is to get the coating as smooth as possible, but with these, I don't think it matters because any swirls and drips just look like the icecream is melting, and, if anything, makes it more realistic!


If you are going to take macabre delight in creating some dropped icecreams, now is the time. As soon as you dip the balls and put them on the cones, sprinkle liberally with sprinkles and then upend them at an angle on some baking paper.


It looks even more effective if the coating on these ones is liberal so that it spreads out a bit, just like icecream does when it hits the pavement. I have an exact memory of that particular image :-(


By now, the pink coating is probably dry so it's time for the chocolate topping. Because as we all know, an icecream without chocolate topping isn't really an icecream at all.

Melt some dark chocolate melts (I used mint flavoured ones) - you don't need much - and get your sprinkles ready. I also laid out some red and orange mini M&Ms, for the 'cherry' on the top.


Using a teaspoon, drop some chocolate mixture onto the top of the cone.


Shake the cone slightly from side to side, to get the chocolate to spread a bit unevenly, or use the spoon to smooth it down a little, You're aiming for the look of chocolate syrup having been squirted on the top from some big canister at the back of Wendy's Supa Sundaes.

Then top it with a mini M&M.


Then take a pinch of the sprinkles and drop them over the cone.


Return the cone back to its position to dry and repeat with the other cones.

You may ask where I got a stand that happens to accommodate mini icecream cones. It's actually a vintage 1970s 3D tic-tac-toe played with marbles, courtesy of my Dad. The holes are to hold the marbles but they happened to be the perfect dimension to hold mini cones. Serendipity.


So there you have it... faux icecream cake pops, brimming with orange cake, cream cheese icing and chocolate.

Enjoy!

Monday 17 October 2011

Chocolate whoopie pies with marshmallow chocolate filling

These bite size whoopie pies are my third whoopie pie experiment, and the first one that's actually worked yay!
They are about the same size as macarons, so I guess you could think of them as a kind of cakey macaron.


I made these using a brand new whoopie pie tin (who knew you could get these in Australia?)  - thanks to my shopping professional mum, who can find just about anything if asked. I swear one day I'll ask her to find me some sand from the moon landing and I'll get it for my next birthday.

The relevant things about this tin are a) very flat depressions for the whoopie pies, b) it's very heavy and thick so it distributes heat well and cooks the pies through without burning them; and c) it's nonstick.


I made a chocolate mud cake mixture and filled the whoopie tin holes with a teaspoon.


They looked like tiny pikelets. I was worried that they would rise too much and come right out of their holes and spread across the tin, but they were fine.


I gave them ten minutes in the very bottom of an oven heated to 160C.
This is where I really appreciated the quality of the cake pan- because it was so thick and heavy, it distributed the heat really well so that the little whoopie pies didn't burn even though they were so thin.
Also, the nonstick coating of the pan was top class. Some don't really work that well but this one released the pies with only the smallest encouragement from a spatula.


I put the whoopie pies on a rack to cool and started the filling.

This was possibly the weirdest (but one of the nicest) cake fillings I have ever made. It was like nothing I've ever made before, perhaps because I've never experimented with marshmallow.

Chocolate Marshmallow Filling
(from Claire Ptak's The Whoopie Pie Book)

Ingredients
100g dark chocolate
3 egg whites
150g caster sugar
2 tbsp golden syrup
pinch salt

First you need to melt the chocolate over simmering water, in the top of a double boiler saucepan, or you can build yourself a rickety saucepan plus bowl combo like I've done here (above).

Put the chocolate aside to cool a little. Then put all the other ingredients in another bowl and place this bowl on top of the saucepan of simmering water. Whisk the mixture until it's well combined.


At this point the recipe calls for you to beat it by hand for 10-12 minutes. All I can say is that I tried beating for about 3 minutes and my arm nearly dropped off. So I did the sensible thing, and switched to an electric beater.
I didn't know if this would affect it badly so I tried to do it as 'slowly' as you can do with electric - putting it on the lowest setting, only using one beater instead of two, and turning the beater off every 20 seconds to stir manually for 10 seconds. This worked fine.
The mixture slowly becomes very foamy and hot.


Take it off the heat and turn the beater to high speed, whipping up a storm. The mixture will (bizarrely) go much lighter in colour, from a mid brown to nearly white, and will get thicker and thicker - keep beating until it's almost too firm to beat.


Then, very gently, fold in the melted chocolate with a wooden spoon or spatula. This pic shows the chocolate being folded in super gently.

First time I made this, I had a disaster at this point (which I didn't photograph) - I stupidly assumed I could just beat the chocolate in, using the electric beater, just as I had been beating the mixture to its very firm and pale state. But when I tried, the mixture quickly lost all its firmness and turned into a sloppy mess.

The penny dropped when I saw what I had done - it's basically a cooked meringue mixture, with egg whites being responsible for the consistency. When you add other, heavy ingredients to meringue (like melted chocolate) you have to be careful to fold them in really gently because if you beat them in, you will beat all the air out of the egg whites and the mixture will sink. That's what I did with this mixture. I tried to save it by beating up a couple more egg whites to stiff peak and folding them in to firm the mixture, but it was useless - I had to throw it away and start again.
After the chocolate was DELICATELY folded in to the marshmallow mixture, I loaded it into a piping bag and piped a generous dollop onto half of the whoopie pies, then sandwiching them together.

You could just spoon it out but on balance it seemed easier and less messy to pipe it.


To finish them I melted down a small amount of milk chocolate and dolloped it on top, and stuck crystallised violets to it. I love the violet colour with the dark brown of the cake. You could use any type of decoration though.

A quick note, I also had trouble melting the milk chocolate smoothly - probably because I wasn't using couverture, just using a good quality eating chocolate. Well, actually it was a pretty basic quality eating chocolate. It melted patchily and lumpily, and you know what? I just thought 'What the hell,' and used it anyway, and hoped that the crystallised violets would cover up the lumps - which they did.

Key lessons from my chocolate whoopie pie experience:

1. A really solid thick cake pan is a good cake pan.
2. What did people do before nonstick surfaces?
3. Marshmallow filling is awesome and relatively easy to make, and I want to use it more.
4. Don't beat heavy ingredients into egg whites at stiff peak and expect them to like it.

Sunday 16 October 2011

How to make rose macarons

Rose macarons are a delicate, fragrant, very feminine version of these treats.
The flavour is similar to turkish delight - I only say that because I don't come across rose flavouring very often and that's the only comparison that comes to mind.


Aside from the normal macaron ingredients, you need rose syrup for the flavouring.
This is difficult to find, and I looked everywhere without success before dropping some massive hints to my parents. They got on the case and I was delighted to unwrap a shiny bottle of Sirop de Monin - Rose from an Express Post parcel on my birthday yay!

You may be wondering why I didn't use rosewater or rose essence. You can get these much more easily. I haven't tried to use either, and they may work as well, but I thought the syrup would be safer as macaron mixture is very bad-tempered in a culinary sense and I didn't want to stress it by adding something watery like rosewater. I am still quite traumatised by my experience when trying to make raspberry macarons, when I added an icy raspberry coulis to the mixture and it turned into the macarons from hell.


So I started off in the normal way with the tant pour tant (for detailed instructions on how to make it, see here)...


... And to the tant pour tant mixture I added the rose syrup. I used two capfuls, but did it gradually, adding one first and then tasting.


Then you need to add a bit of colour because although the syrup has a pink tint it's not deep enough to colour the mixture. This is the gel colour I use. The amount on the very end of the spoon handle is about all you need - again it's really important to add it gradually, and start small, because you can always add more but you can't go backwards.


This is the colour of the mixture after the colouring was added. It was perfect for what I wanted, but....


... By the time I had added the other half of the mixture - the meringue - the colour had become a little too diluted. I wish I'd added just a bit more colour up front.


These are the piping bags I use. They are easy to fill but I always tend to put too much mixture in them.


So by the time I'm piping, there is sticky, gooey mixture absolutely everywhere.


If you can get past the mess, it's good to hold the piping bag vertical and pipe downwards - you get nice even circles that way.


Once they are all piped they need to sit and firm up and form a skin for half an hour - here they are sitting and having a little think about themselves before being baked.
The pink mixture in the bowl is the buttercream - I'll get to that eventually :-)


Because of my shocker of an experience with raspberry macarons (if you feel like reading about it you'll find it here) I was really worried about whether the rose syrup would work. I couldn't wait until they came out of the oven, I had to have a peep while they were still in there. I was so relieved and happy to see them rising up on their little 'feet' like good little macarons should.


So then I started on the buttercream filling. This is variable according to your taste but is about one part unsalted butter to three parts icing sugar, plus an egg yolk. Beat them all together with an electric beater until you have a firm but smooth textured mix.


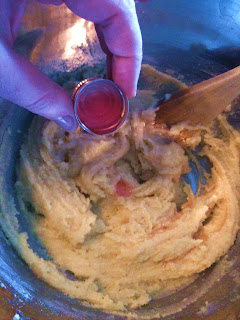
I added the rose syrup to this, about two capfuls and then dipped a very small amount of pink colouring into the mix...


... Which turned a LURID pink, way brighter than I wanted. Bugger!


The finished product wasn't exactly right in colour terms, although they were still pretty.


I had envisaged the shells being a bit darker and the buttercream being a bit lighter, so there wouldn't be much of a colour difference between the two.


They looked good with other pastel shades. These are pistachio macarons left over from another batch (recipe here). 


A quick tasting note on these macarons, the rose syrup makes them very sweet - that sounds obvious as all macarons are sweet, but some flavours like pistachio and coffee have lots of flavour with less additional sugar. So beware, these are best for true sweet tooths.